
Orbital Flush
[I’m] impressed, amused, and entertained!
— Chris Hadfield, retired Canadian astronaut, 2025
That’s very random.
— Andy Lee, founder of Sienci Labs, 2025
tl;dr: Orbital Flush is a toilet that flushes whenever astronauts on the International Space Station (ISS) flush, mounted on a platform that rotates to face the ISS. Yes, it’s a real toilet, but please don’t actually use it. We built our first prototypes in Vancouver, and the final version in Waterloo for the Socratica Symposium.
This is Orbital Flush: Kai’s Version, which is essentially a companion piece to Calvin’s. His blogpost on Orbital Flush is much more concise and coherent, I recommend reading his too!
- What is Orbital Flush?
- How do you know when astronauts flush?
- The first build: Flow regulator, I hardly know ‘er
- The second build: You spin my head right round
- The third build: Symposium, here we come!
- Acknowledgements
What is Orbital Flush?
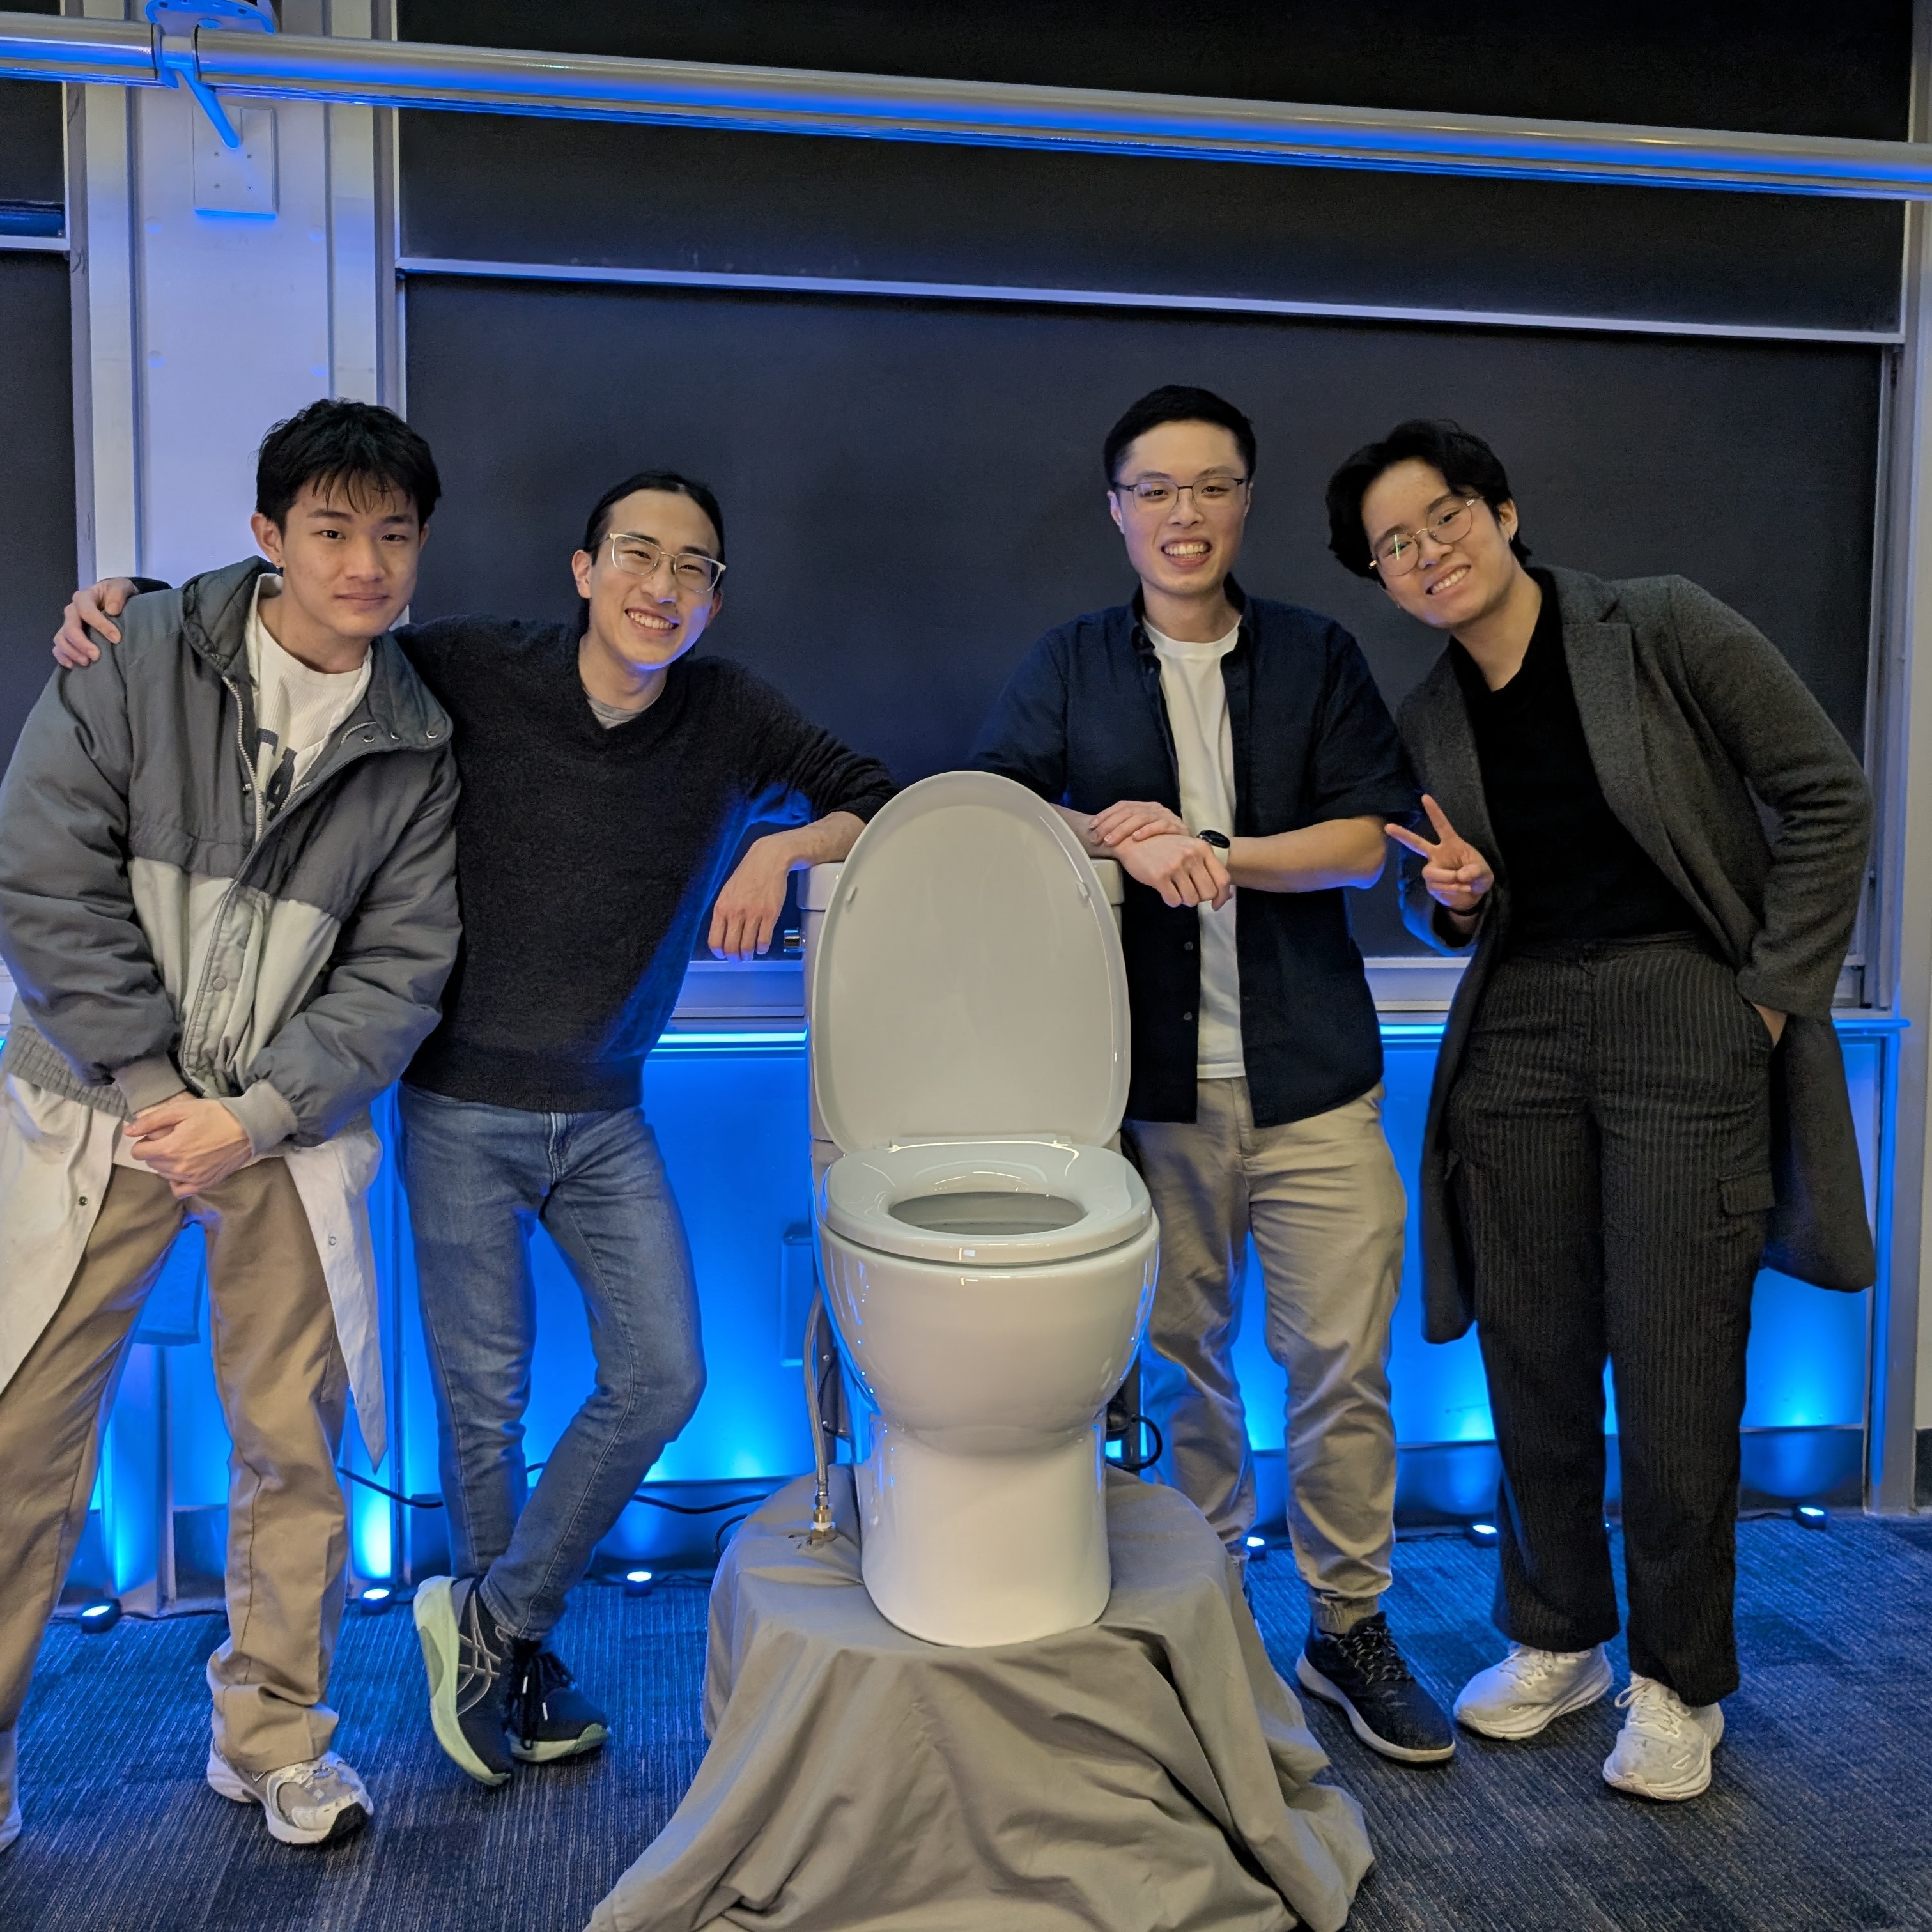
One way to describe Orbital Flush is as a kinetic art installation created by Calvin Liang, myself, and several other collaborators including the inimitable Bill Pan and Chloe Nguyen.
Another way to describe it is as a cheap Home Depot toilet on a spinny platform. This description is funnier, so I prefer it. It rotates to face the International Space Station (ISS), and flushes whenever astronauts on the ISS flush. Or, at least, our best guess of that.
Quick fun stats
- Toilets purchased (and returned): 3
- Last-minute trips to Home Depot: 4
- CNC venues contacted: 11
- CNC bits broken: 3
- Average astro-flushes recorded per day: 20
Why?
Why not?
How do you know when astronauts flush?
Excellent question. NASA wisely makes the decision not to tell us, because that would be weird. However, they provide enough data for us to make a fairly educated guess. See, NASA provides a large amount of realtime ISS telemetry data11. If you’re curious about the details of why, Calvin wrote about it in more detail in his blogpost. This, and perhaps how he got this absurd idea in the first place, are probably the only things he wrote about in more detail than I. . Among those numerous data points is the live urine tank level onboard, as a key component of the life support console. As such, we ended up collecting something like two weeks of live ISS urine tank level data so we could get a sense for what that looks like. Here’s just a sample of what that data looks like:
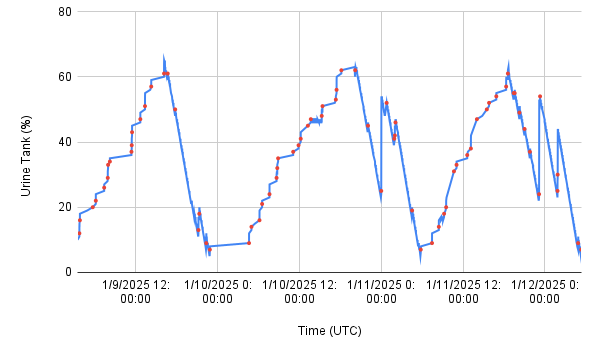
One would assume, rather logically, that when the urine tank level went up, it would imply that an astronaut took a leak. However, the percentages sometimes oscillate ±1%, so not every increase in tank level is a genuine “urine deposit”22. This is a real term that I found amidst the mountains of NASA urine tank documentation I read over the course of this project. . The red dots are “flushes” that we infer because the change in urine tank level is large enough to count, and it’s likely to not just be random noise.
Several other interesting observations: there are lengthy periods where the urine tank level decreases. This is when the ISS water reclamation system is in operation, extracting usable water from the liters of urine sitting around. You can also observe very large increases in urine tank level, where 30% or more of the tank gets filled up at once. This urine tank has about 8L of capacity, implying that this is more than 2L of urine added at once. While it’s extremely amusing to think this is one particular astronaut with a simply astronomical bladder, this is likely transfers of urine from the storage tanks of the other toilets on board the ISS that aren’t directly linked to the main urine tank.
Aside: Urine management on the ISS, abridged
I now have unfortunate and unnecessary amounts of knowledge about urine management on the ISS, and I shall now deliver this information to you.
As most of you should know, humans produce both solid and liquid waste from distinct orifices. On the ISS, these are collected separately. Instead of dropping the kids off at the pool, the “kids” are vacuum-bagged for transport back to Earth for eventual disposal. The handling of liquid gold, on the other hand, has many more steps involved.
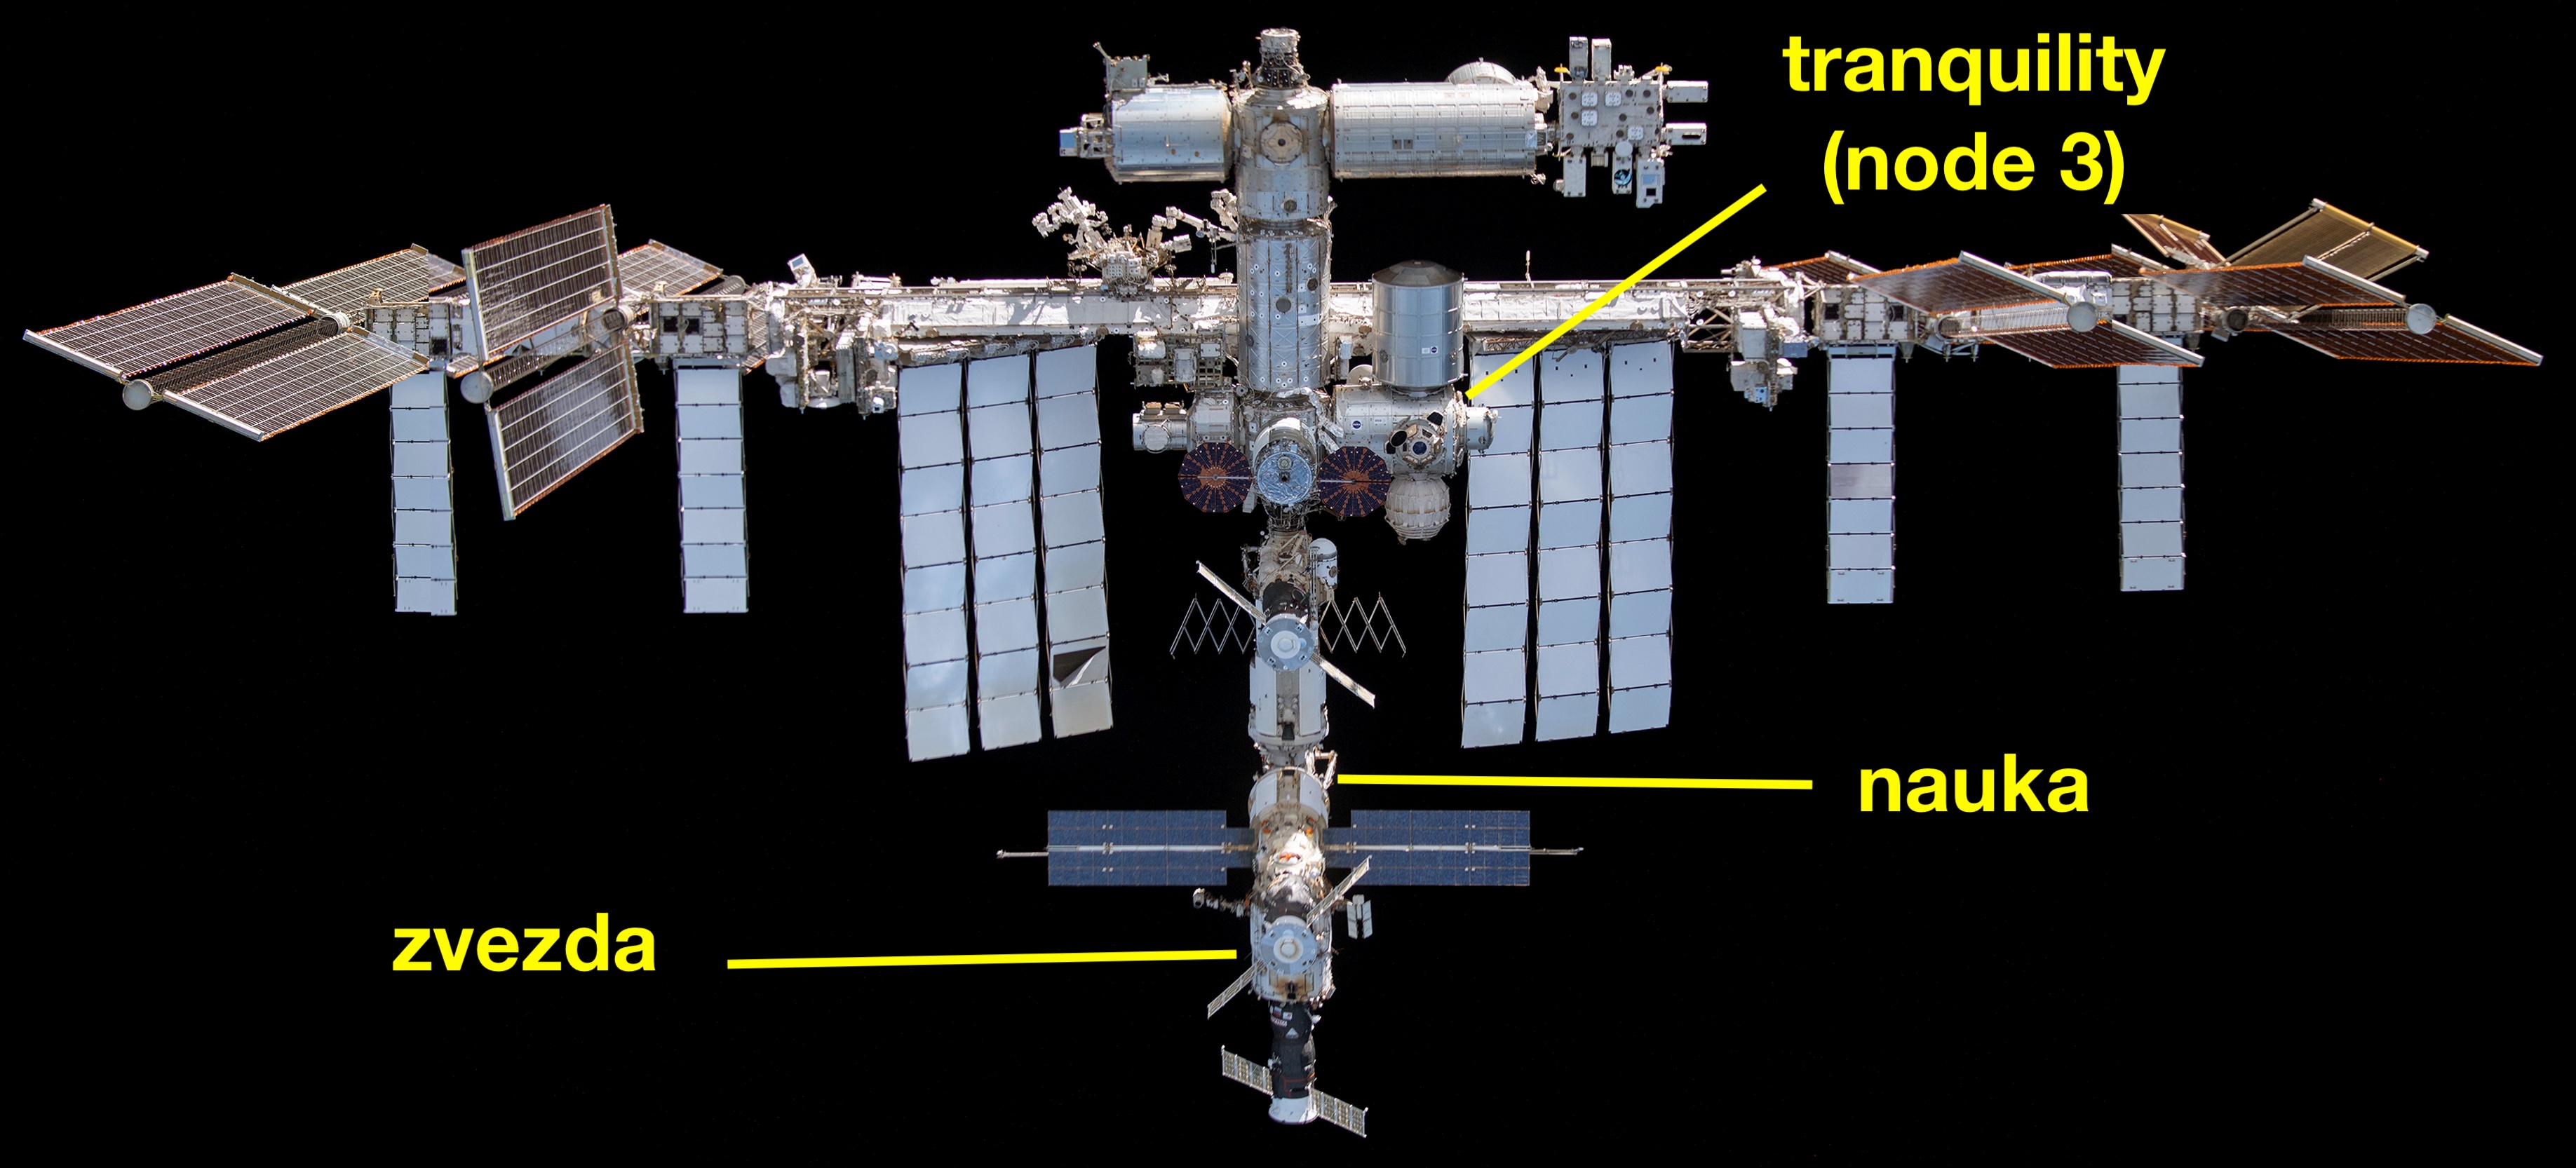
To my knowledge, there are three space toilets, also known as Waste Hygiene Compartments (WHC), on the ISS. One of them, the one in Tranquility within the American segment, is directly connected to the Water Recovery System (which, confusingly, is only one of two separate water recovery systems on the ISS); the other two are in the Russian segment and are not.
Due to the lack of gravity in space, you essentially pee into a vacuum hose, which sucks up the urine, treats it with some kind of acid to control microbial growth, and sends it to an internal urine tank. These internal urine tanks are either automatically (in the case of the one in Tranquility) or manually emptied into the Wastewater Storage Tank Assembly (WSTA) of the Urine Processor Assembly (UPA). All this to say, astronauts on the ISS will sometimes have to lug around a tank filled with their pee because of water conservation. So it’s probably not too much work for you to turn your taps off when not in use, just saying.
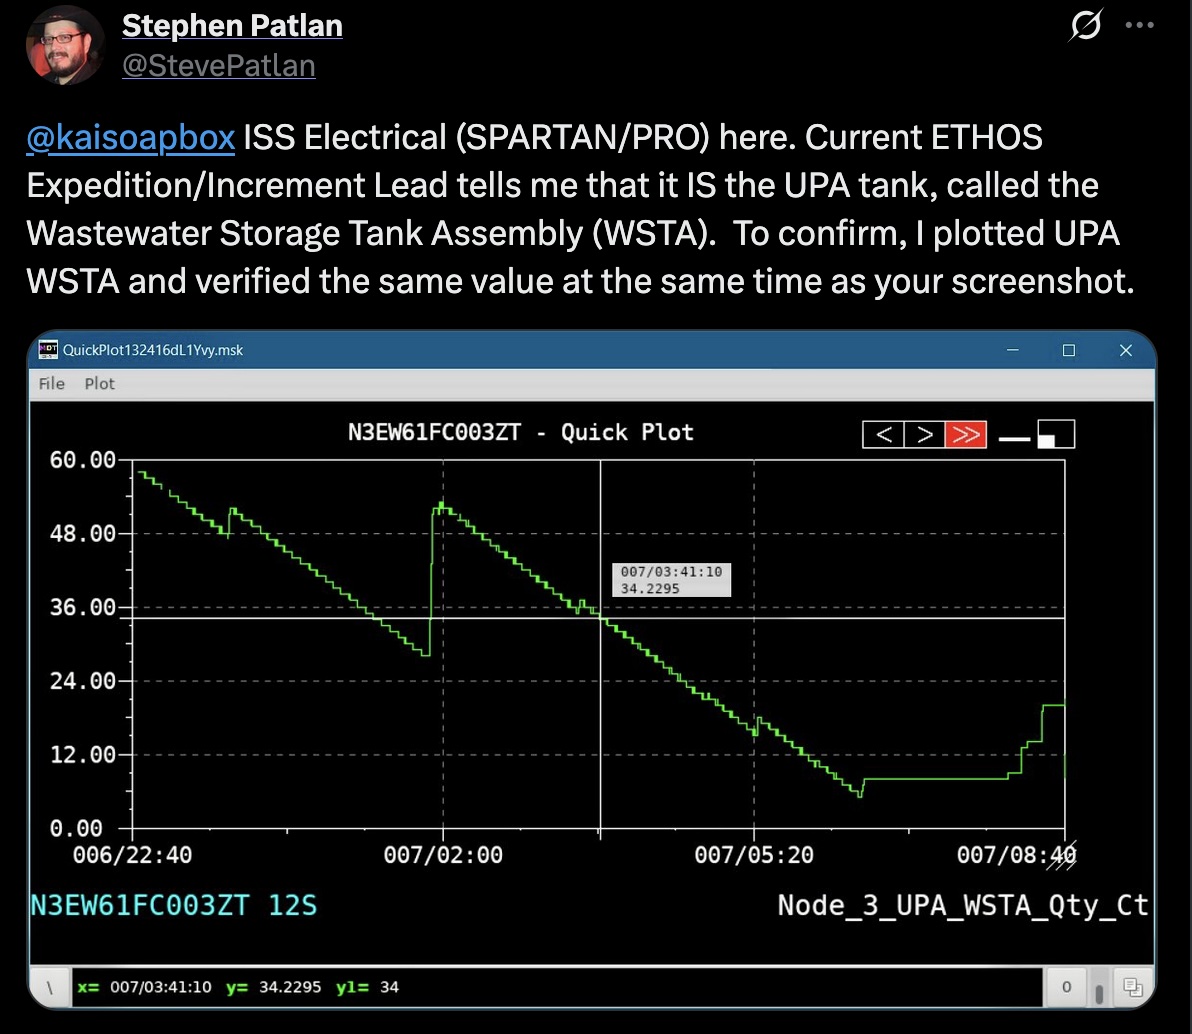
Note that this also implies that there are several urine tanks on the ISS, not just one. This thus begs the question, which urine tank level do we have? It took a bunch of research for me to conclude it was likely to be the WSTA, but I did also get confirmation on Twitter/X by someone from NASA mission control (!) that it was indeed that tank.
When the WSTA is full enough, the UPA activates and sends urine to the Distillation Assembly (DA), which uses vacuum distillation to separate the distillate from what they term “urine concentrate”. Instant urine, just add water!
… anyway. The distillate, which is presumably mostly water, goes off to the Water Processor Assembly (WPA), which purifies the wastewater and makes it drinkable again through Science and Magic but Mostly Science. The urine concentrate, or “brine” as they like to euphemize, is further processed through the Brine Processor Assembly (BPA, not to be confused with the endocrine-disrupting chemical used in manufacturing of certain plastics). It extracts even more water, releasing it as humdity to the internal ISS atmosphere, and concentrates the urine even further. This presumably very gross final product is finally stored in a tank to be brought back to Earth for disposal.
If you wouldn’t believe it, this is already somewhat simplified. The full water and urine management system is described in the following very understandable diagram.
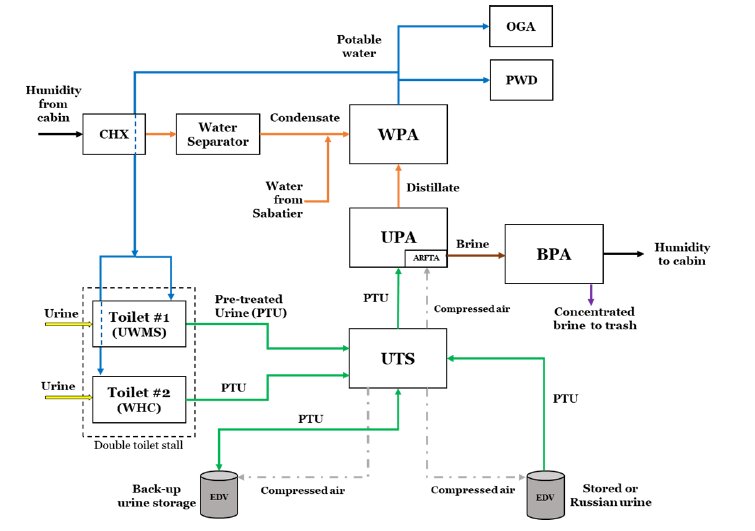
To summarize: astronauts pee into a suction hose. The water in their urine is extracted in a lengthy multi-step process, eventually resulting in them either drinking it again or using it to maintain the humidity inside the ISS. The leftover urine concentrate is discarded. And now you know too.
The first build: Flow regulator, I hardly know ‘er
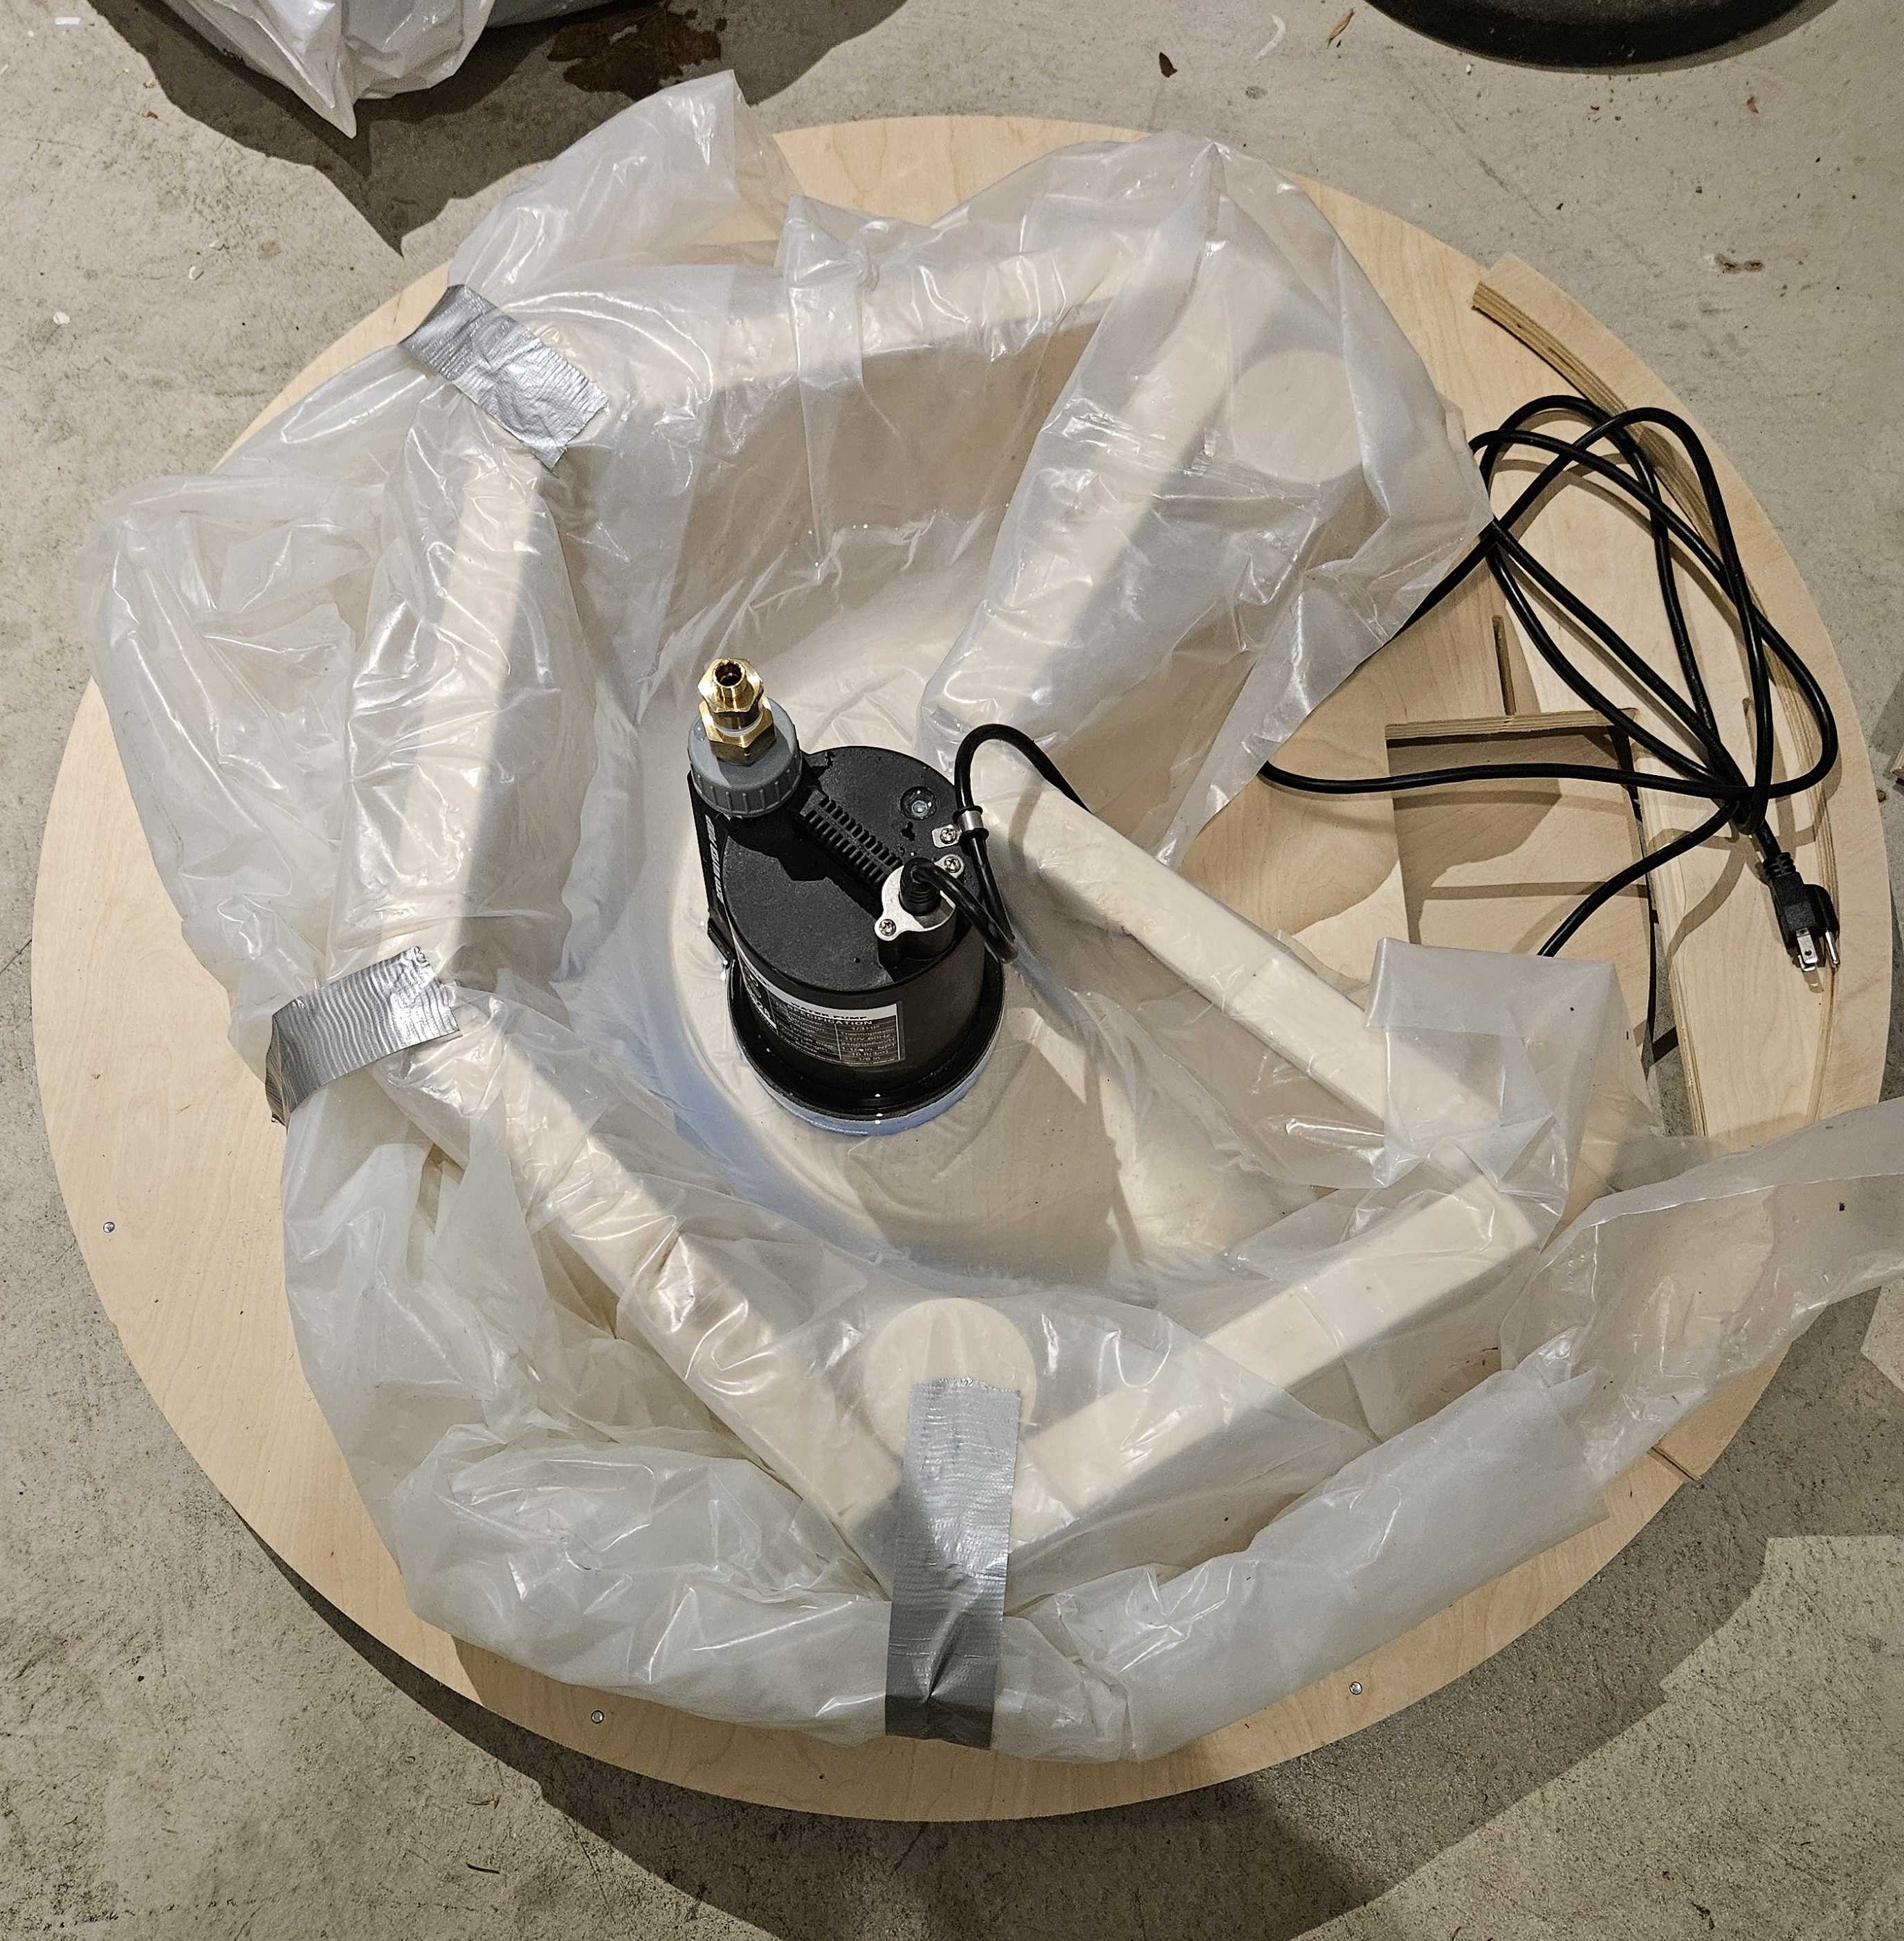
Toilets on Earth flush by letting water flow from the tank into the bowl, and then drain out into sewage pipes underneath, with the tank water level replenished by pressurized water coming in from your water main. Since we couldn’t reasonably expect to have a water hookup wherever we are, our plan was for Orbital Flush to self-contain all the water that it needs, and cycle it around when flushing. As such, we were going to have a secondary water tank underneath our toilet, and then use a submersible water pump to get it back into the top tank for the next flush.
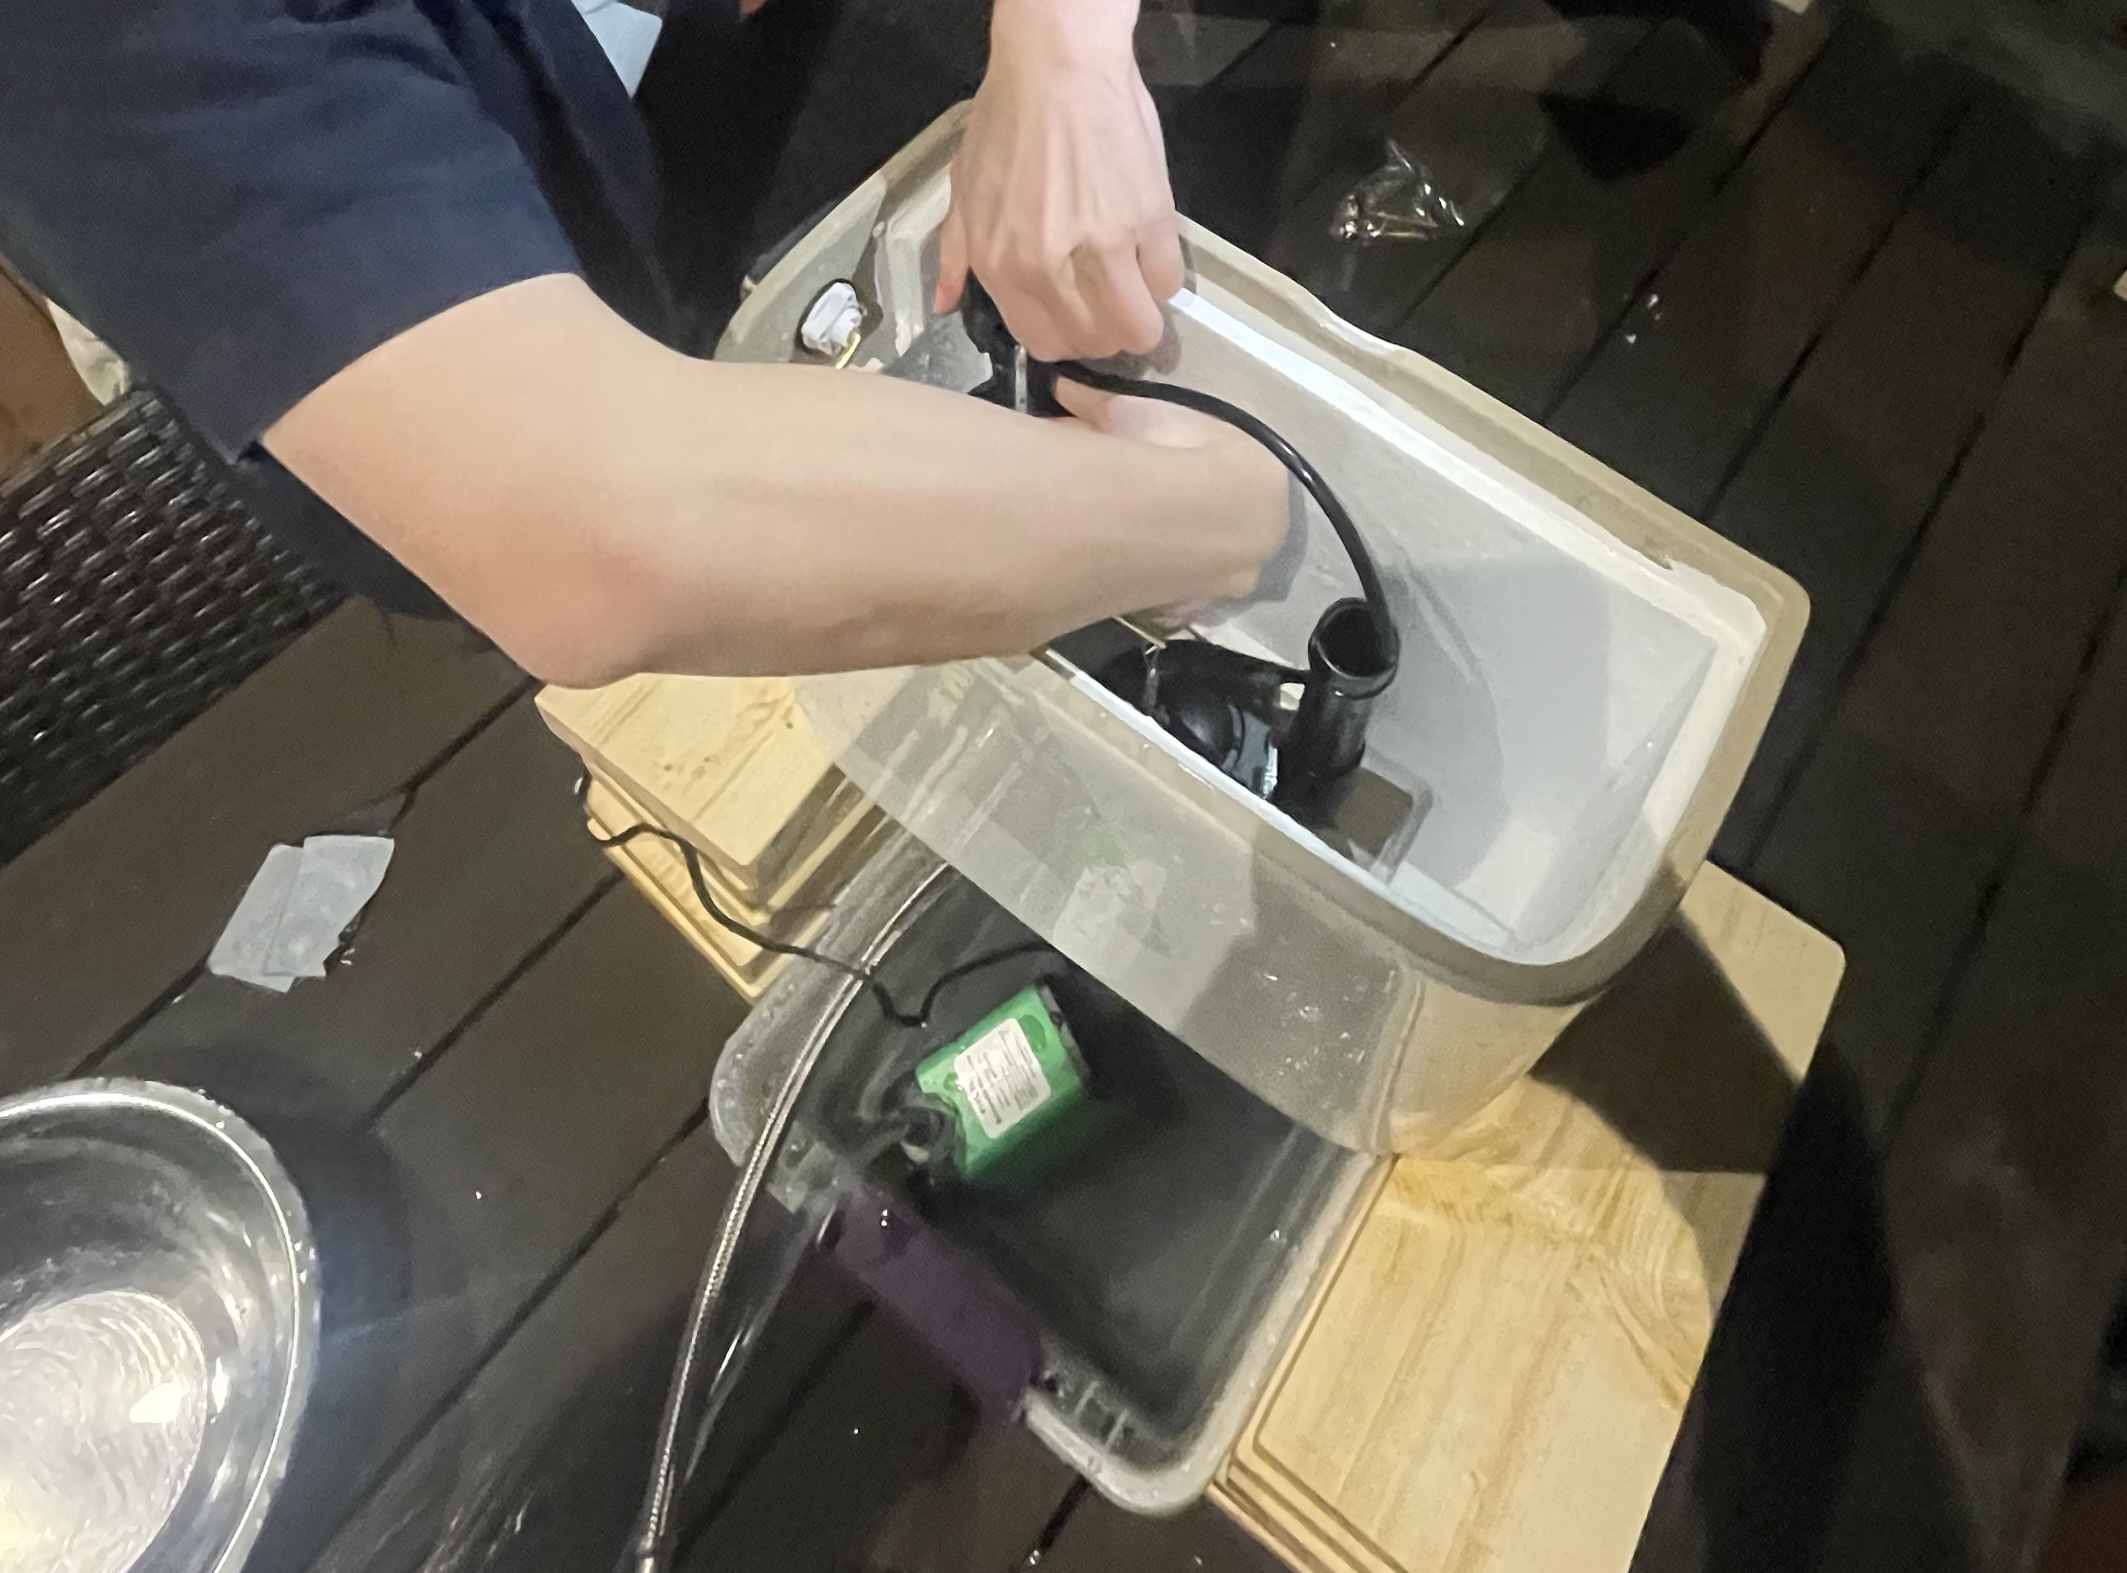
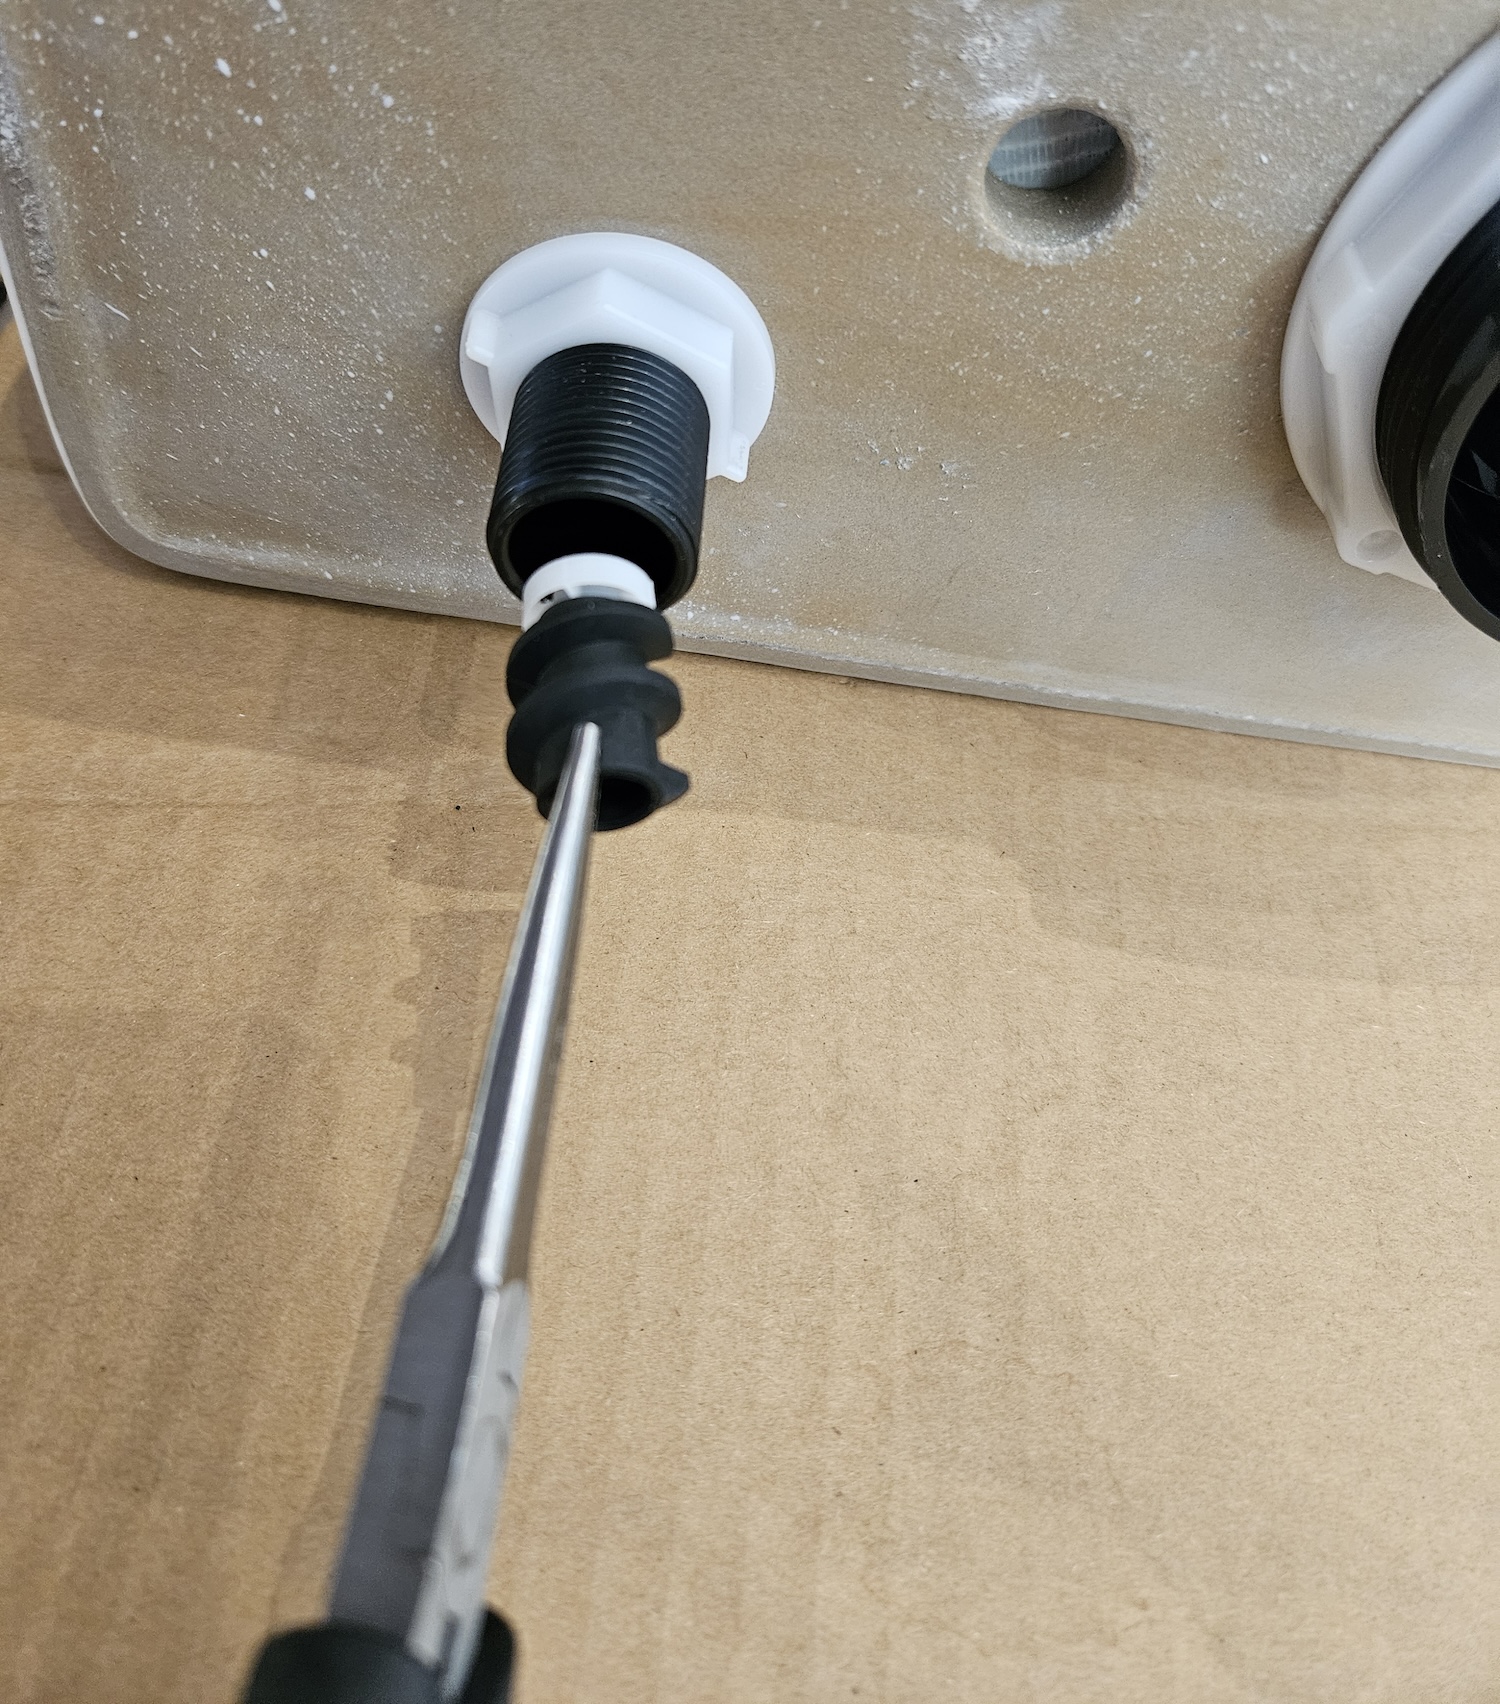
We quickly discovered that while we could get water to flow back up into the top tank, it would do so very slowly. This makes sense—water normally comes in through your pipes at ~50 psi, which we most certainly were not achieving with our diminuitive water pump. After some plumbing-related research, I discovered that Big Plumbing™ is artificially limiting the rate at which your toilet tank fills with a flow regulator33. Please do not actually remove your flow regulator, your toilet and pipes may not enjoy that. , which mitigates the rate of water flow into your toilet. We need no such mitigation, so… we removed it!
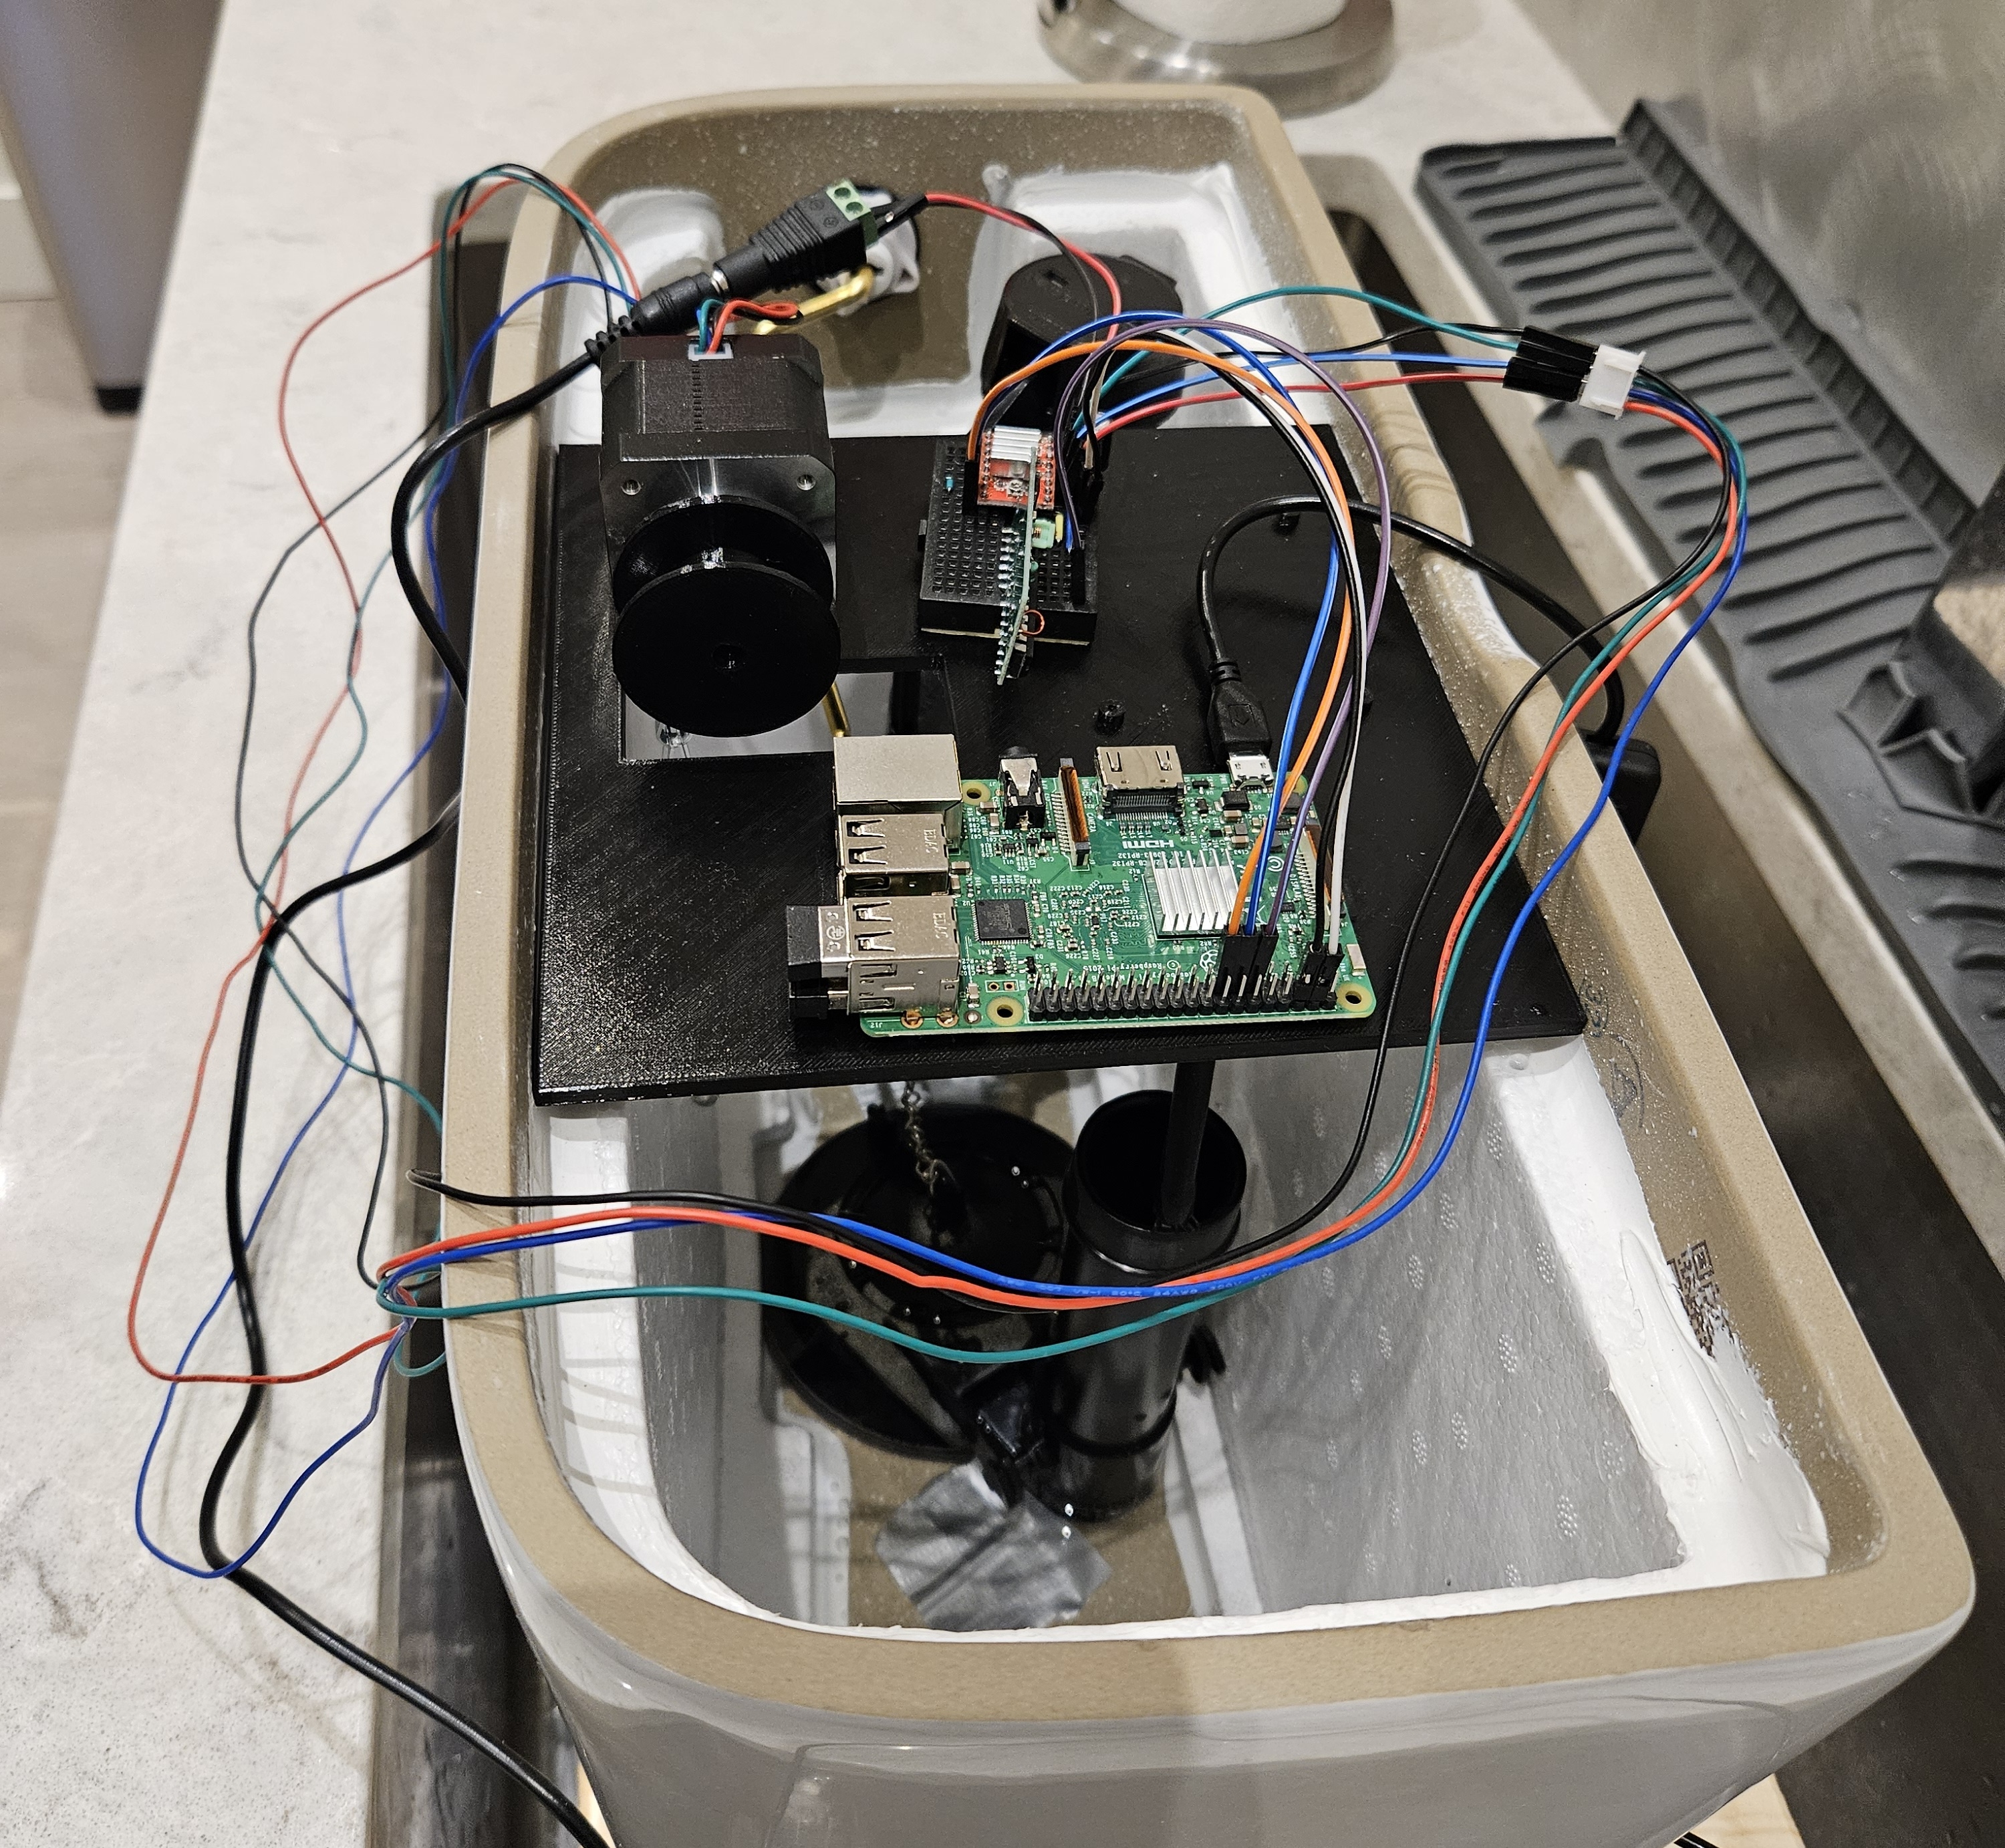
This still wasn’t enough, and we still ended up needing a more powerful pump. But with that sorted out, we could move on to subsequent steps, such as actually actuating the toilet lever. To do this, we stuck a Raspberry Pi very securely on a 3D-printed platform placed inside the top of the tank. This controlled a motor, raising and lowering the toilet flapper chain whenever an ISS flush was detected.
With that, minutes before we were going to show it off, we hastily assembled all the components for the first time backstage at the Atelier Showcase!
It worked beautifully, not bad for a week’s work!
We returned the toilet to Home Depot later that week.44. Their return policy allows you to return a product within 30 days with a receipt and the original packaging. The staff would open up the toilet box, see all the smaller boxes we neatly re-packed inside, and ask whether we’d used it. We would then sadly “confess” that it didn’t fit in the bathroom, and then they’d process our refund.
The second build: You spin my head right round
At this point, we were ready for bigger and grander things. It was time to construct the rotating platform.
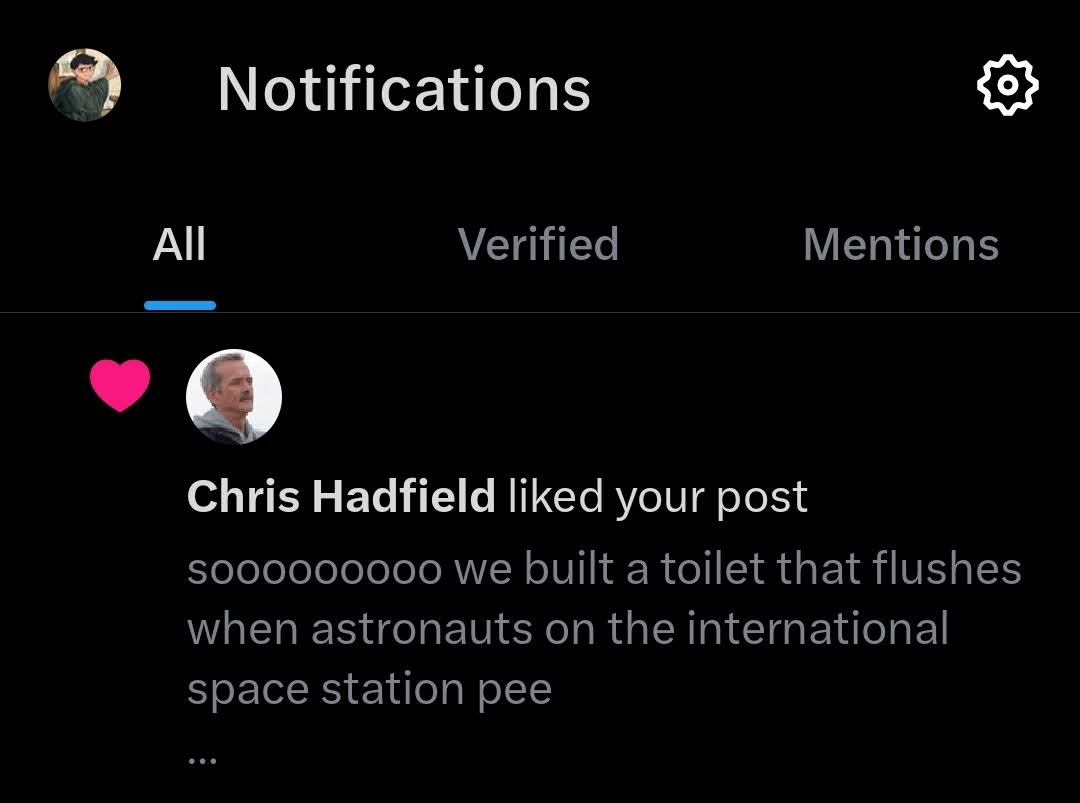
Aside: Colonel Hadfield, care to flush a toilet with us on stage?
We had to email Chris Hadfield to see if he was available to come down to the Socratica Symposium to demo Orbital Flush with us. Obviously.
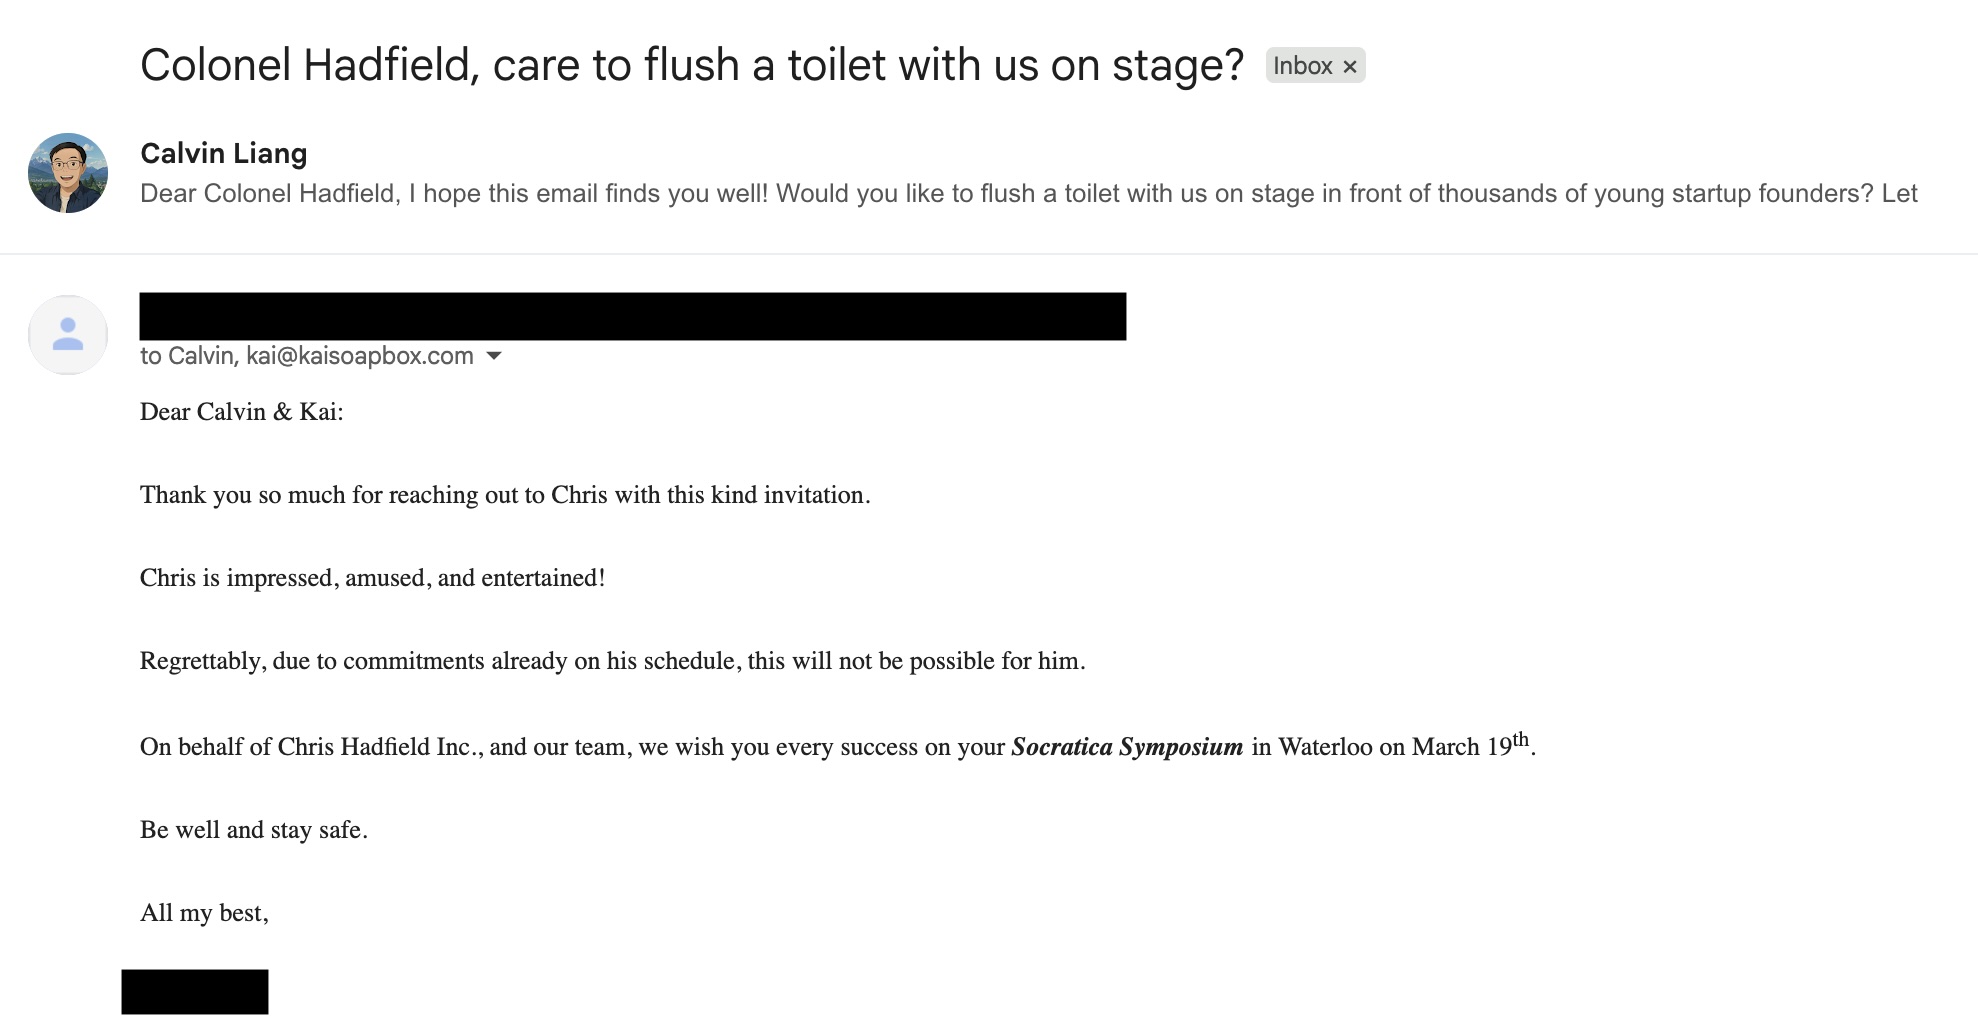
In the process of this, Chris Hadfield (or his social media manager) ended up reading and liking my thread about our Orbital Flush project thus far.
It’s unfortunate that he wasn’t available, but I think I know why—his granddaughter, Wren Hadfield, was born just a few days after Symposium! Welcome to the world, Wren <3
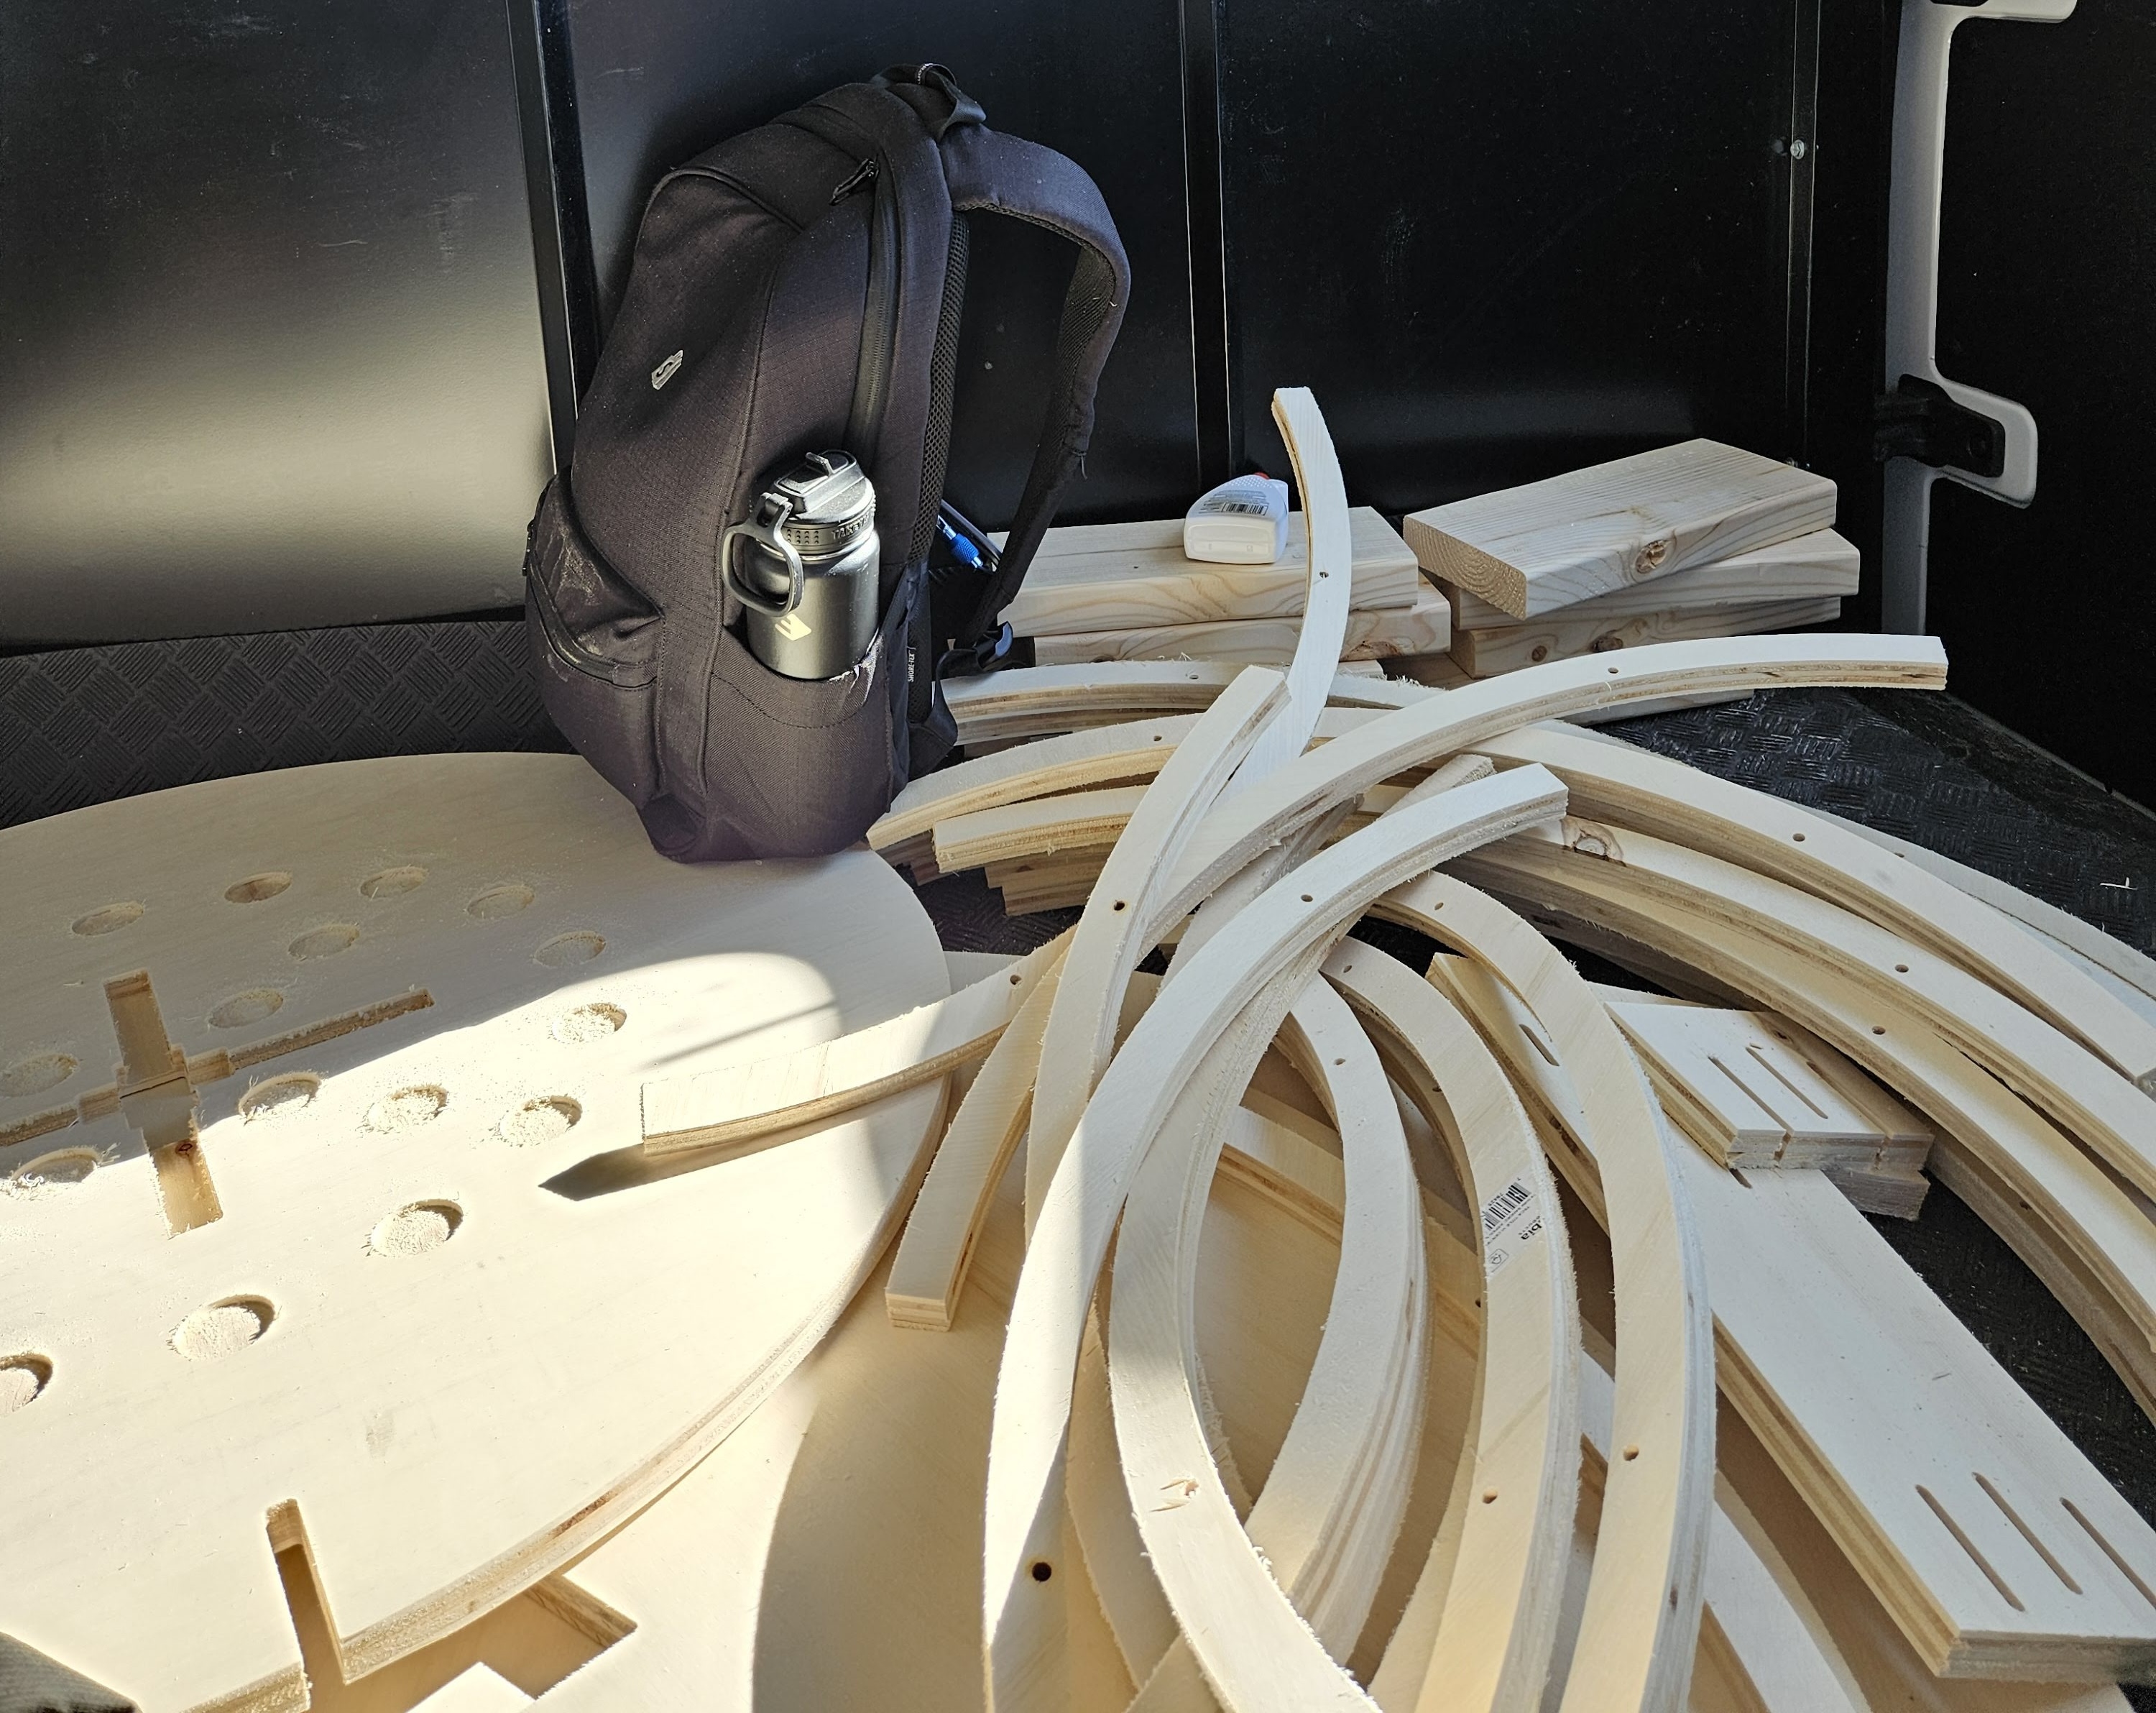
Across many design brainstorming sessions, we came up with several different designs, before eventually settling on a design with a rigid central axle that the platform will rotate around, suspended on a raft of freely rotating ball bearings. The platform in itself would be a hollow cylinder: two plywood circles, with the walls composed of lots of little slices made from the remaining plywood material.
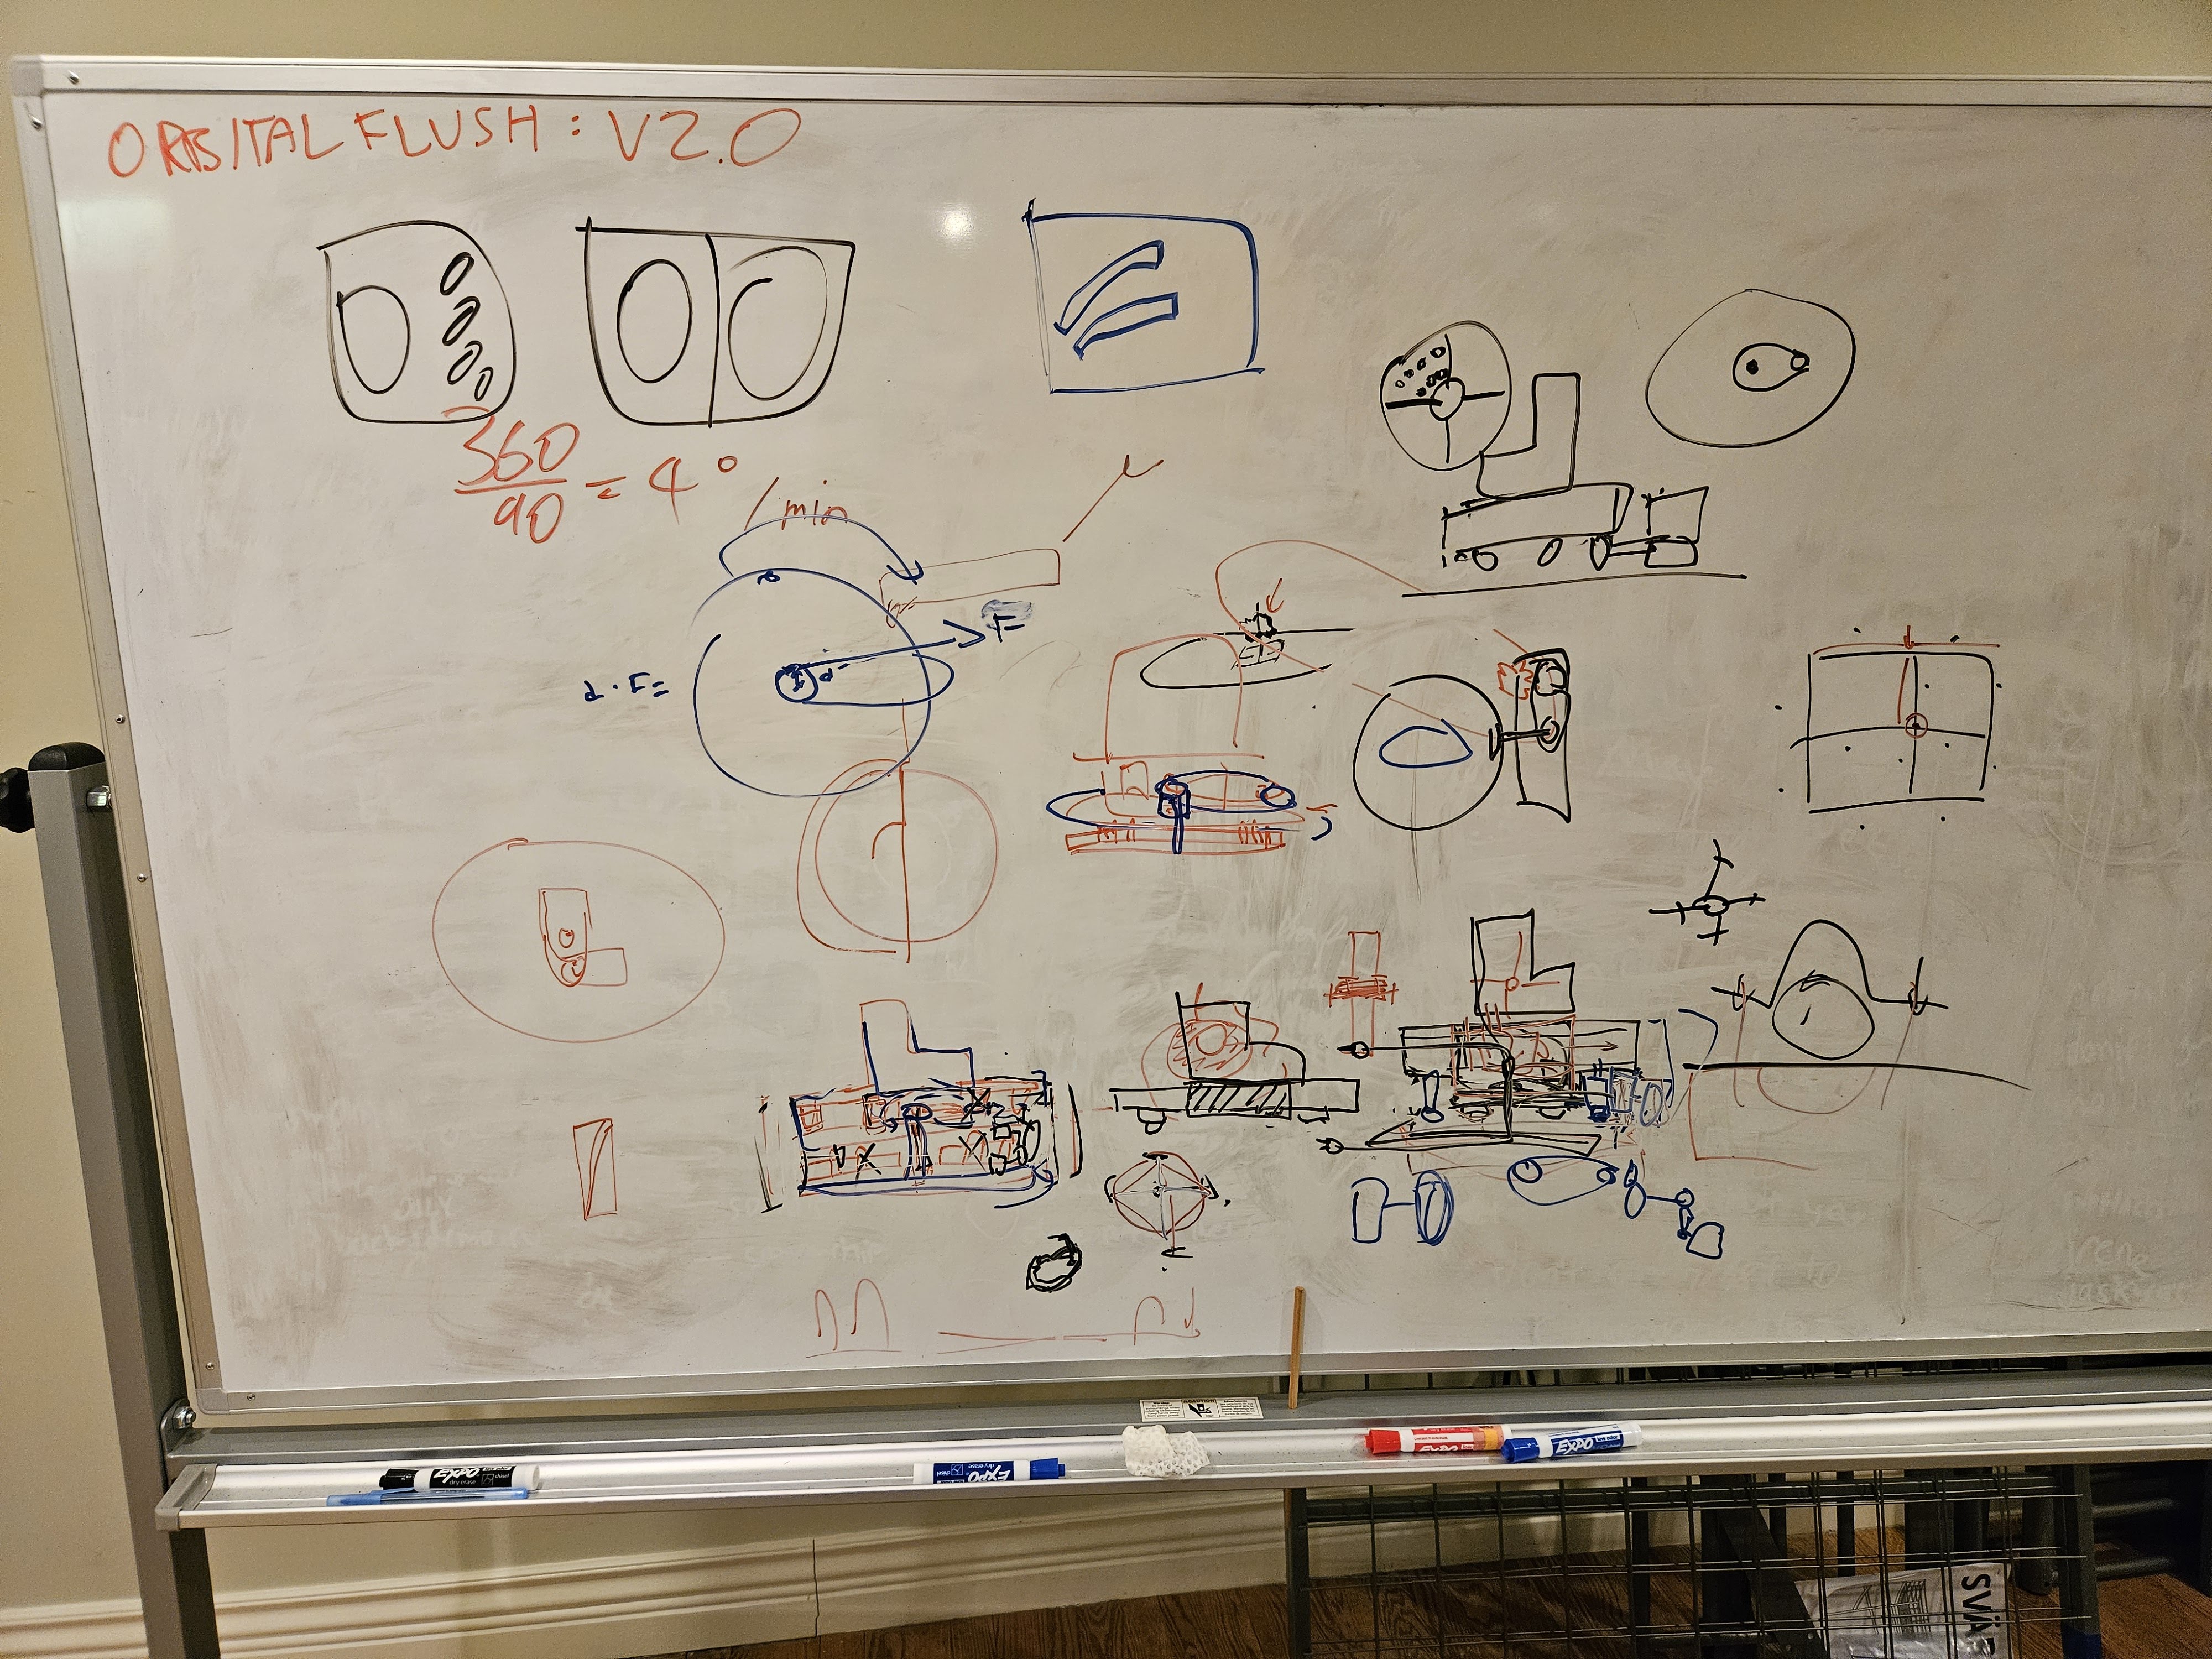
The interior of the cylinder would thus contain the water tank, water pump, and motor for actually rotating the platform later. With this finally settled, in the week before Calvin and I were going to fly over to Waterloo, we got to CNCing everything out and actually assembling the prototype to make sure it worked.
We spent most of our afternoons and evenings that week running back and forth between his garage and Home Depot, with the occasional detour to MakerLabs to do our CNCing, and the night before each of our flights, we ended up with a functional rotating platform!
… oops. That’s going to leave a mark.55. And would you believe we managed to return this toilet too, chipped porcelain and all?
The third build: Symposium, here we come!
Having run out of time in Vancouver, it was now time for us to rebuild everything in Waterloo. We decided to do this because it seemed cost-prohibitive to ship everything over, but in retrospect it would’ve been significantly easier to do that instead.
T-2 days: Hi, can we use your CNC router?
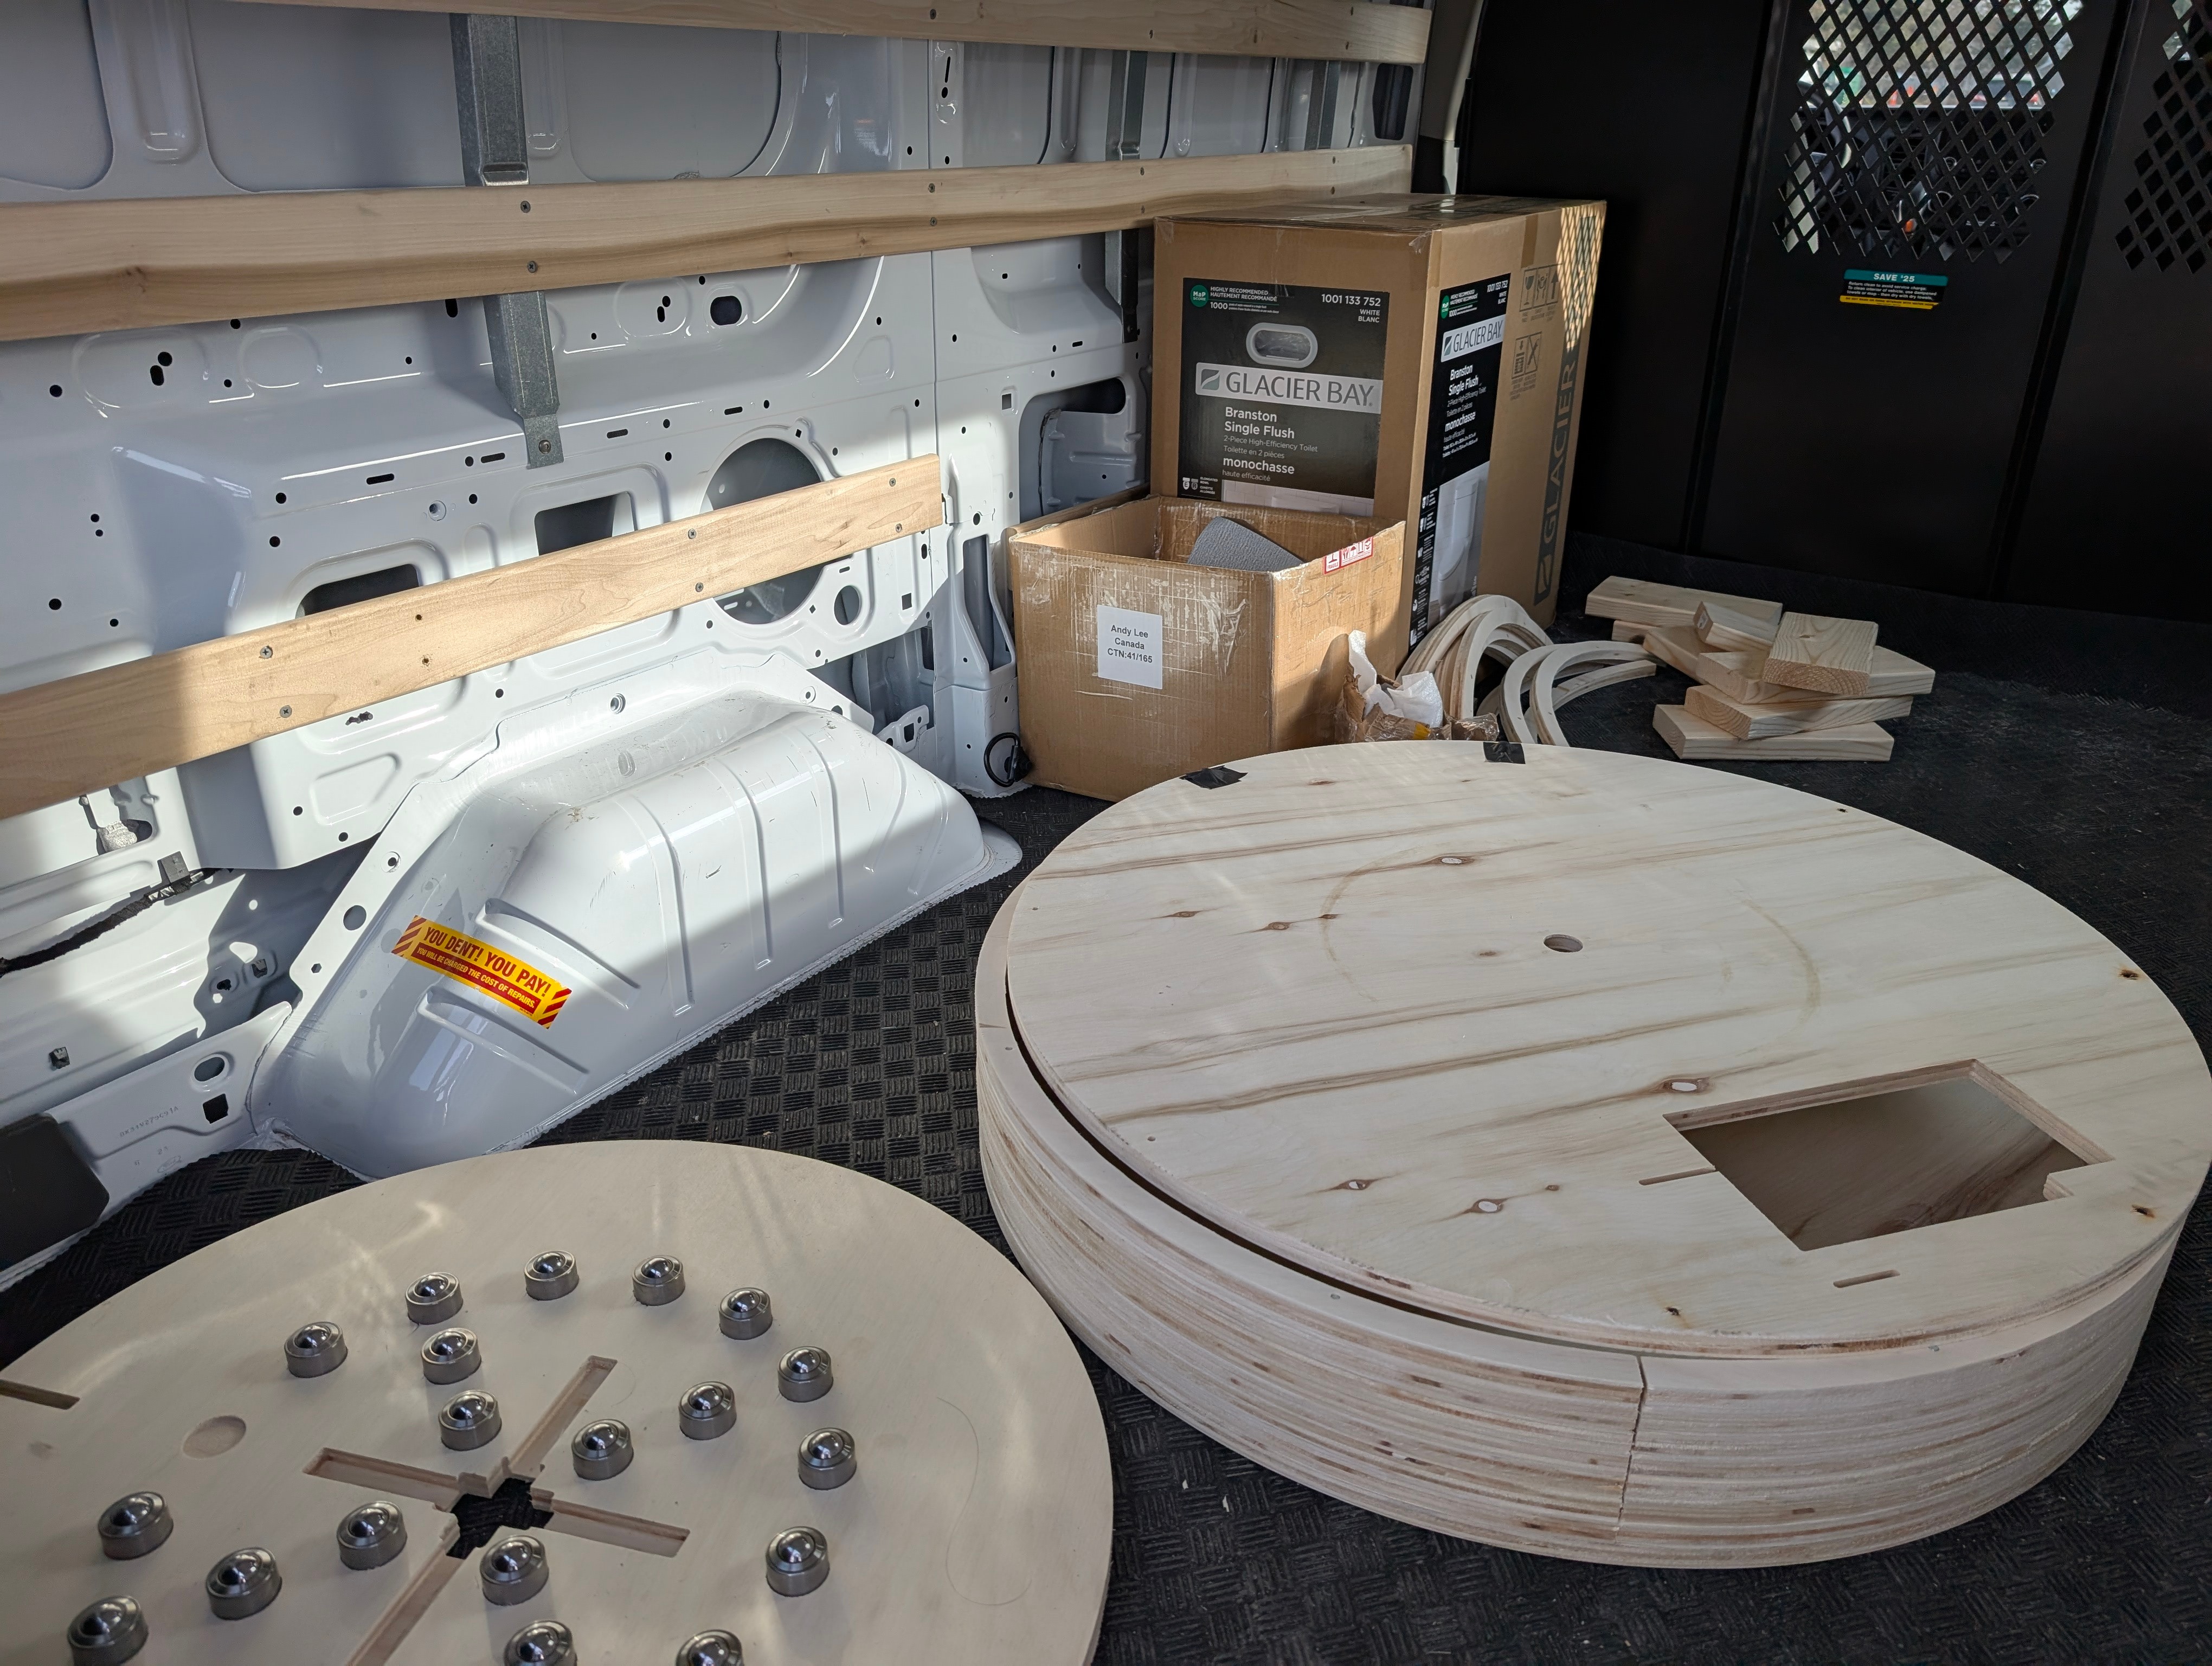
We were initially planning on replicating our design using a CNC router at the University of Waterloo, but we discovered that friends willing and able to let us use their alma mater’s expensive and dangerous engineering equipment were few and far between. And so we pivoted. And by that, I mean, I reached out to every makerspace and CNC router provider in the Kitchener/Waterloo area. And when that didn’t initially pan out, I tried the entire Greater Toronto Area.
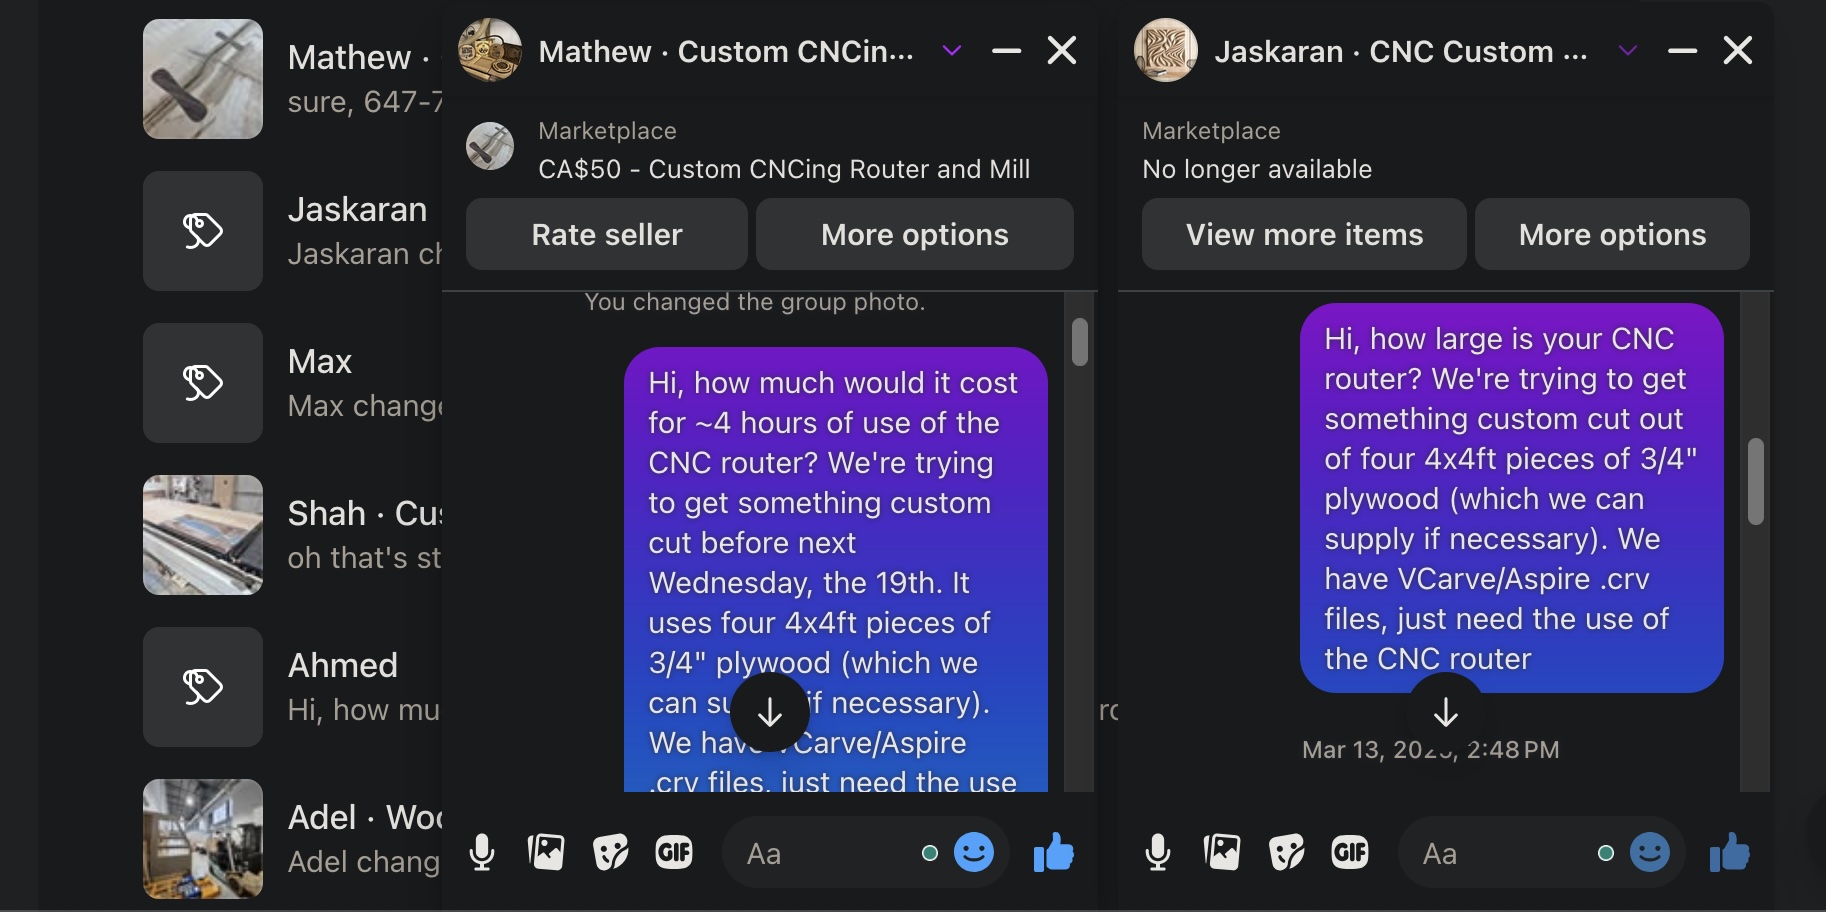
Eventually, the Kwartzlab Makerspace (thanks Konstantin <3) suggested that we reach out to Sienci Labs (pronounced like CNC), who said yes! Within a day we had confirmed the details, with one small hitch: they couldn’t open the VCarve file we sent them due to licensing restrictions66. Apparently, files created on the Makerspace edition, as our files were, cannot be opened using the Pro edition. Same with the free trial version. . So we would have to either:
- Remote into the Makerspace computer, make our changes, and export the G-code (i.e. the actual step-by-step cut instructions for the CNC router) directly,
- Create new G-code using a different software without the licensing restrictions, or
- Recreate the VCarve file from an Adobe Illustrator file using their software on the day itself.
After determining that Option 1 was probably not possible, I then tried Option 2. I downloaded and learned 5 different CAD/CAM software, before concluding that most of them suck quite hard77. I’m sure Onshape and Autodesk Fusion 360 are great for professionals, but I found them rather confusing and overwhelming. Carbide Create is very simple, but the latest version that will let you export G-code without a Pro subscription is V6 (last released in 2022, they’re on V8 already), and it’s… just okay. Easel just seemed kinda mid tbh. VCarve definitely seems to be the most usable of them, the pain of licensing restrictions aside. , and that there are many intimidating and scary settings that should be configured based on the capabilities of your CNC router, which I do not know. And so we found ourselves forced into Option 3, and getting help from the incredible Scott Saari of Sienci Labs to configure the VCarve settings to fit the AltMill.
So, in the days before the journey to Sienci Labs, I found myself speedrunning learning VCarve such that I would be able to recreate whatever changes need to be made to our files the next morning. Did I mention that VCarve is Windows-only, and I have a Mac laptop, and I tried using it with Wine and it didn’t work? I ended up having my brother turn on my desktop computer back in Vancouver so I could Chrome Remote Desktop into it, install VCarve, and practice recreating our VCarve file using the hotel TV as a second monitor. Curse you, VCarve licensing restrictions!

Thankfully, thanks to the generosity of the lovely folks at Sienci who seemed absolutely tickled by our ridiculous project, we got to witness the AltMill in action88. Not sponsored, just a fan now. If you like making cool hardware projects, you should consider getting a Sienci CNC router for your workshop! .
And after chewing through a handful of their CNC bits (sorry…), we had everything we needed!
T-1 day: Magnetometers, how do they work?
Aside: Our final (and fruitless) components run
One annoying problem that we had noticed was that during regular operation, the water pump would heat the water sitting in the tank, making it surprisingly warm after a prolonged period. This presumably wouldn’t be a noticeable problem for its intended usage in large volumes of water (like swimming pools), but was very noticeable for us. As such, we thought to try only providing power to the water pump for a limited duration of time after a flush. Unfortunately, the voltage of the water pump is very different than that of our Raspberry Pi board, thus necessitating us acquiring some kind of voltage converter for electrical engineering reasons I don’t understand.
The nearest electronics component shop that could possibly have what we needed was in the barely-not-nearby-enough-to-be-convenient city of Guelph, and so we set off on our final last-minute journey for components.

Alas, they did not actually have what we needed, so we ultimately returned to the hotel room dejected and empty-handed, having burned much time that we very much did not have.
It was the afternoon before Symposium, and all we have is a pile of wood, a bunch of parts, and a dream. While we had already tested some smaller assemblies of the larger electronic components (i.e. the motor), and we knew how to get the toilet flushing, everything else was still unevaluated. Picture the scene, then, as we connect our magnetometer to power for the first time, figure out how to read it from the Raspberry Pi, and spin it around, only to conclude that the headings values are incredibly inaccurate, off by anywhere from 10 to 180 degrees for any given direction.
After an extended period of panicked research, we discovered that every magnetometer requires calibration due to various sources of hard and soft iron magnetic distortion. In brief, nearby ferromagnetic objects will produce a magnetic field that will end up throwing off the underlying reading, and so it is expected that you will have to account for that. To do the calibration, you slowly rotate the magnetometer around, collecting the raw readings, infer the distortions from the data and correct for it.
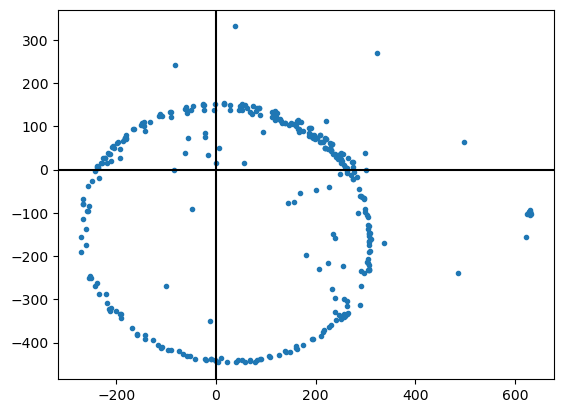
Soft iron distortion would warping the circle into some kind of ellipsoid, and hard iron distortion just shifts the circle to no longer be centered around the origin. Thankfully, we appear to only have hard iron distortion, so it was relatively easy to correct for. So we found some constants to shift the X/Y values over by, used them to calculate our headings, and much to our surprise, the new heading values were actually roughly correct! We’d have to redo our calibration later once we put all the parts inside a toilet, but it would… probably work?
With just hours to go, we then got to writing the code necessary to actually control the motor based on the heading. We couldn’t actually test that this part worked, of course, but famously, programmers working on very tight deadlines never write bugs.
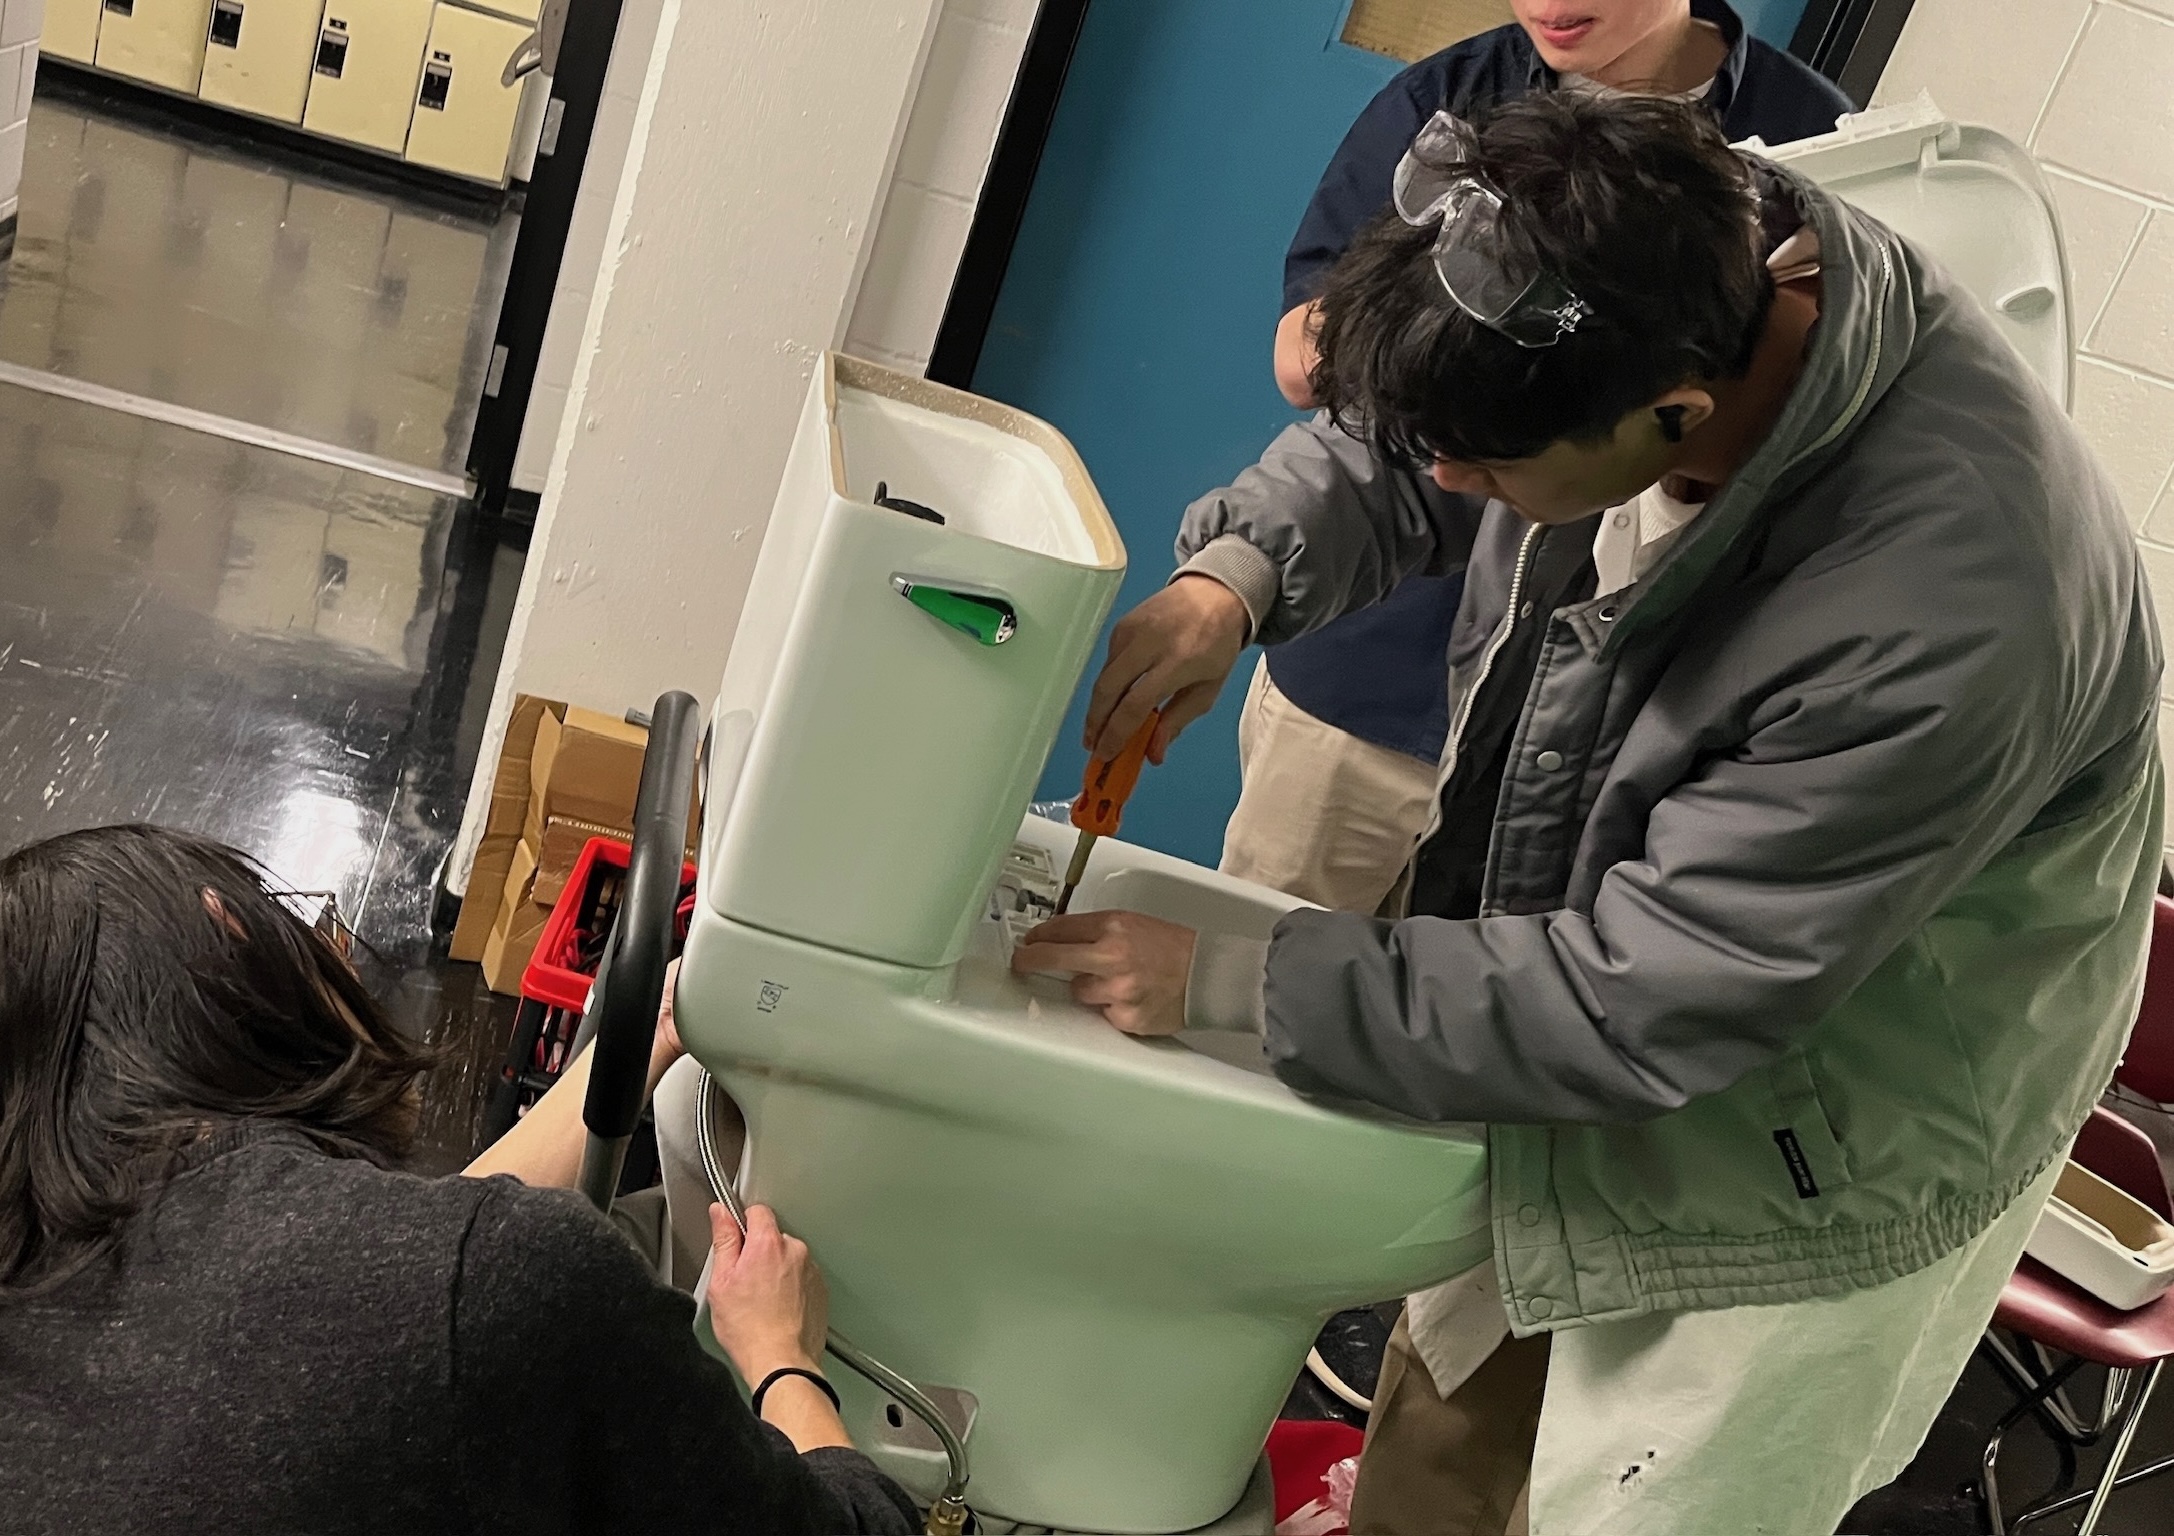
T-1 hour: Putting it all together
We didn’t have the space (or time) to assemble everything in advance, so we had no choice but to pull up to the Socratica Symposium venue in our UHaul, fully assemble everything for the first time ever, redo our magnetic distortion calibration, and just hope against hope that it would all work out.
So we filled up the tank, affixed the motor under the platform, unboxed and assembled our toilet, and connected all the components together. Finally, we applied our finishing touches, which were several sheets of faux marble and some gold tape to hide the seams between sheets, plugged in the motor, and finally witnessed our creation in all its glory. Somewhat unbelievably, the whole thing actually worked post-calibration99. … minor leaking problem notwithstanding. , mere minutes before we were set to begin demoing.
And that’s how we put the “loo” back in Waterloo!
Acknowledgements
We owe a huge thanks to Scott and Andy of Sienci Labs, who let us use an AltMill in their shop to get all our stuff done super last minute. In exchange, they recorded a video of us as promotional marketing material, but all they ended up making was a small Facebook post about it, so we definitely got the better end of the deal.
Shoutout once again to my collaborators in this endeavour, Calvin Liang, Bill Pan and Chloe Nguyen; this wouldn’t have come together without all your ideas, support, and enthusiasm, and I’m grateful to have all of you in my life ❤️. Thanks also to Braeden Hall, who helped transport two large plywood sheets from Home Depot to Sienci Labs. My frail Asian frame could never have managed it alone. Last but not least, deep love and gratitude to our friends and collaborators over at Atelier and Socratica for listening to us rant about this goofy project for months on end, and letting us share it with you all!
Footnotes
-
If you’re curious about the details of why, Calvin wrote about it in more detail in his blogpost. This, and perhaps how he got this absurd idea in the first place, are probably the only things he wrote about in more detail than I. ↩
-
This is a real term that I found amidst the mountains of NASA urine tank documentation I read over the course of this project. ↩
-
Please do not actually remove your flow regulator, your toilet and pipes may not enjoy that. ↩
-
Their return policy allows you to return a product within 30 days with a receipt and the original packaging. The staff would open up the toilet box, see all the smaller boxes we neatly re-packed inside, and ask whether we’d used it. We would then sadly “confess” that it didn’t fit in the bathroom, and then they’d process our refund. ↩
-
And would you believe we managed to return this toilet too, chipped porcelain and all? ↩
-
Apparently, files created on the Makerspace edition, as our files were, cannot be opened using the Pro edition. Same with the free trial version. ↩
-
I’m sure Onshape and Autodesk Fusion 360 are great for professionals, but I found them rather confusing and overwhelming. Carbide Create is very simple, but the latest version that will let you export G-code without a Pro subscription is V6 (last released in 2022, they’re on V8 already), and it’s… just okay. Easel just seemed kinda mid tbh. VCarve definitely seems to be the most usable of them, the pain of licensing restrictions aside. ↩
-
Not sponsored, just a fan now. If you like making cool hardware projects, you should consider getting a Sienci CNC router for your workshop! ↩
-
… minor leaking problem notwithstanding. ↩